Documentation
WoWonder - The Ultimate PHP Social Network Platform
WoWonder would like to welcome you to our official Knowledge Base. In our efforts to continually improve our product and assistance, we've established this new knowledge base and are filling it with user and developer documentation.
- Current Version: 4.3.4
- Author: DoughouzForest
- Created On: 26 Nov, 2015
- Last Update: 20 May, 2024
If you have any questions that are beyond the scope of this help file, Please feel free to email via Item Support Page.
Important! This is the only official WoWonder PHP Script, please stay away from any cracked, nulled or stolen copies, they may contain malwares.
With the official WoWonder license, you get life time free updates, support, and custom work services.
Installation
Follow the steps below to setup your site:
- Unzip the downloaded package and open the /Script folder to find all the script files. You will need to upload these files to your hosting web server using FTP or localhost in order to use it on your website.
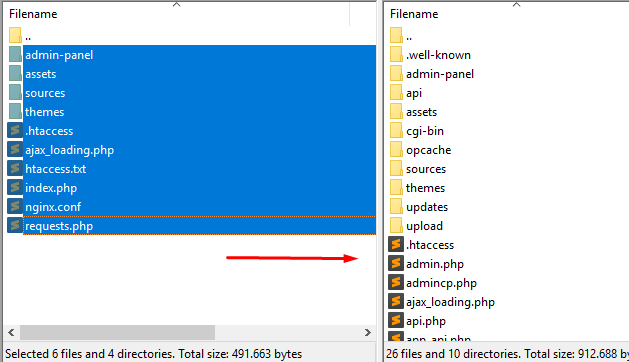
- Below is the folder structure and needs to be uploaded to your website or localhost root directory:
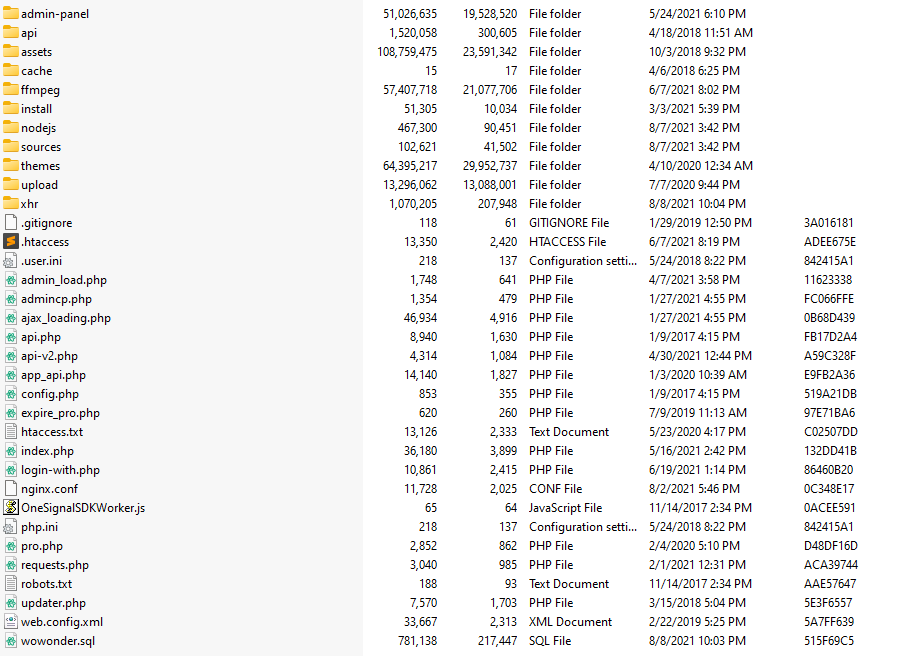
- You should upload all the files.
- Once you are done uploading, open your browser (Google Chrome is recommended).
- Go to http://www.YOUTSITE.com/install
- Agree the Terms of Use then click Next.
-
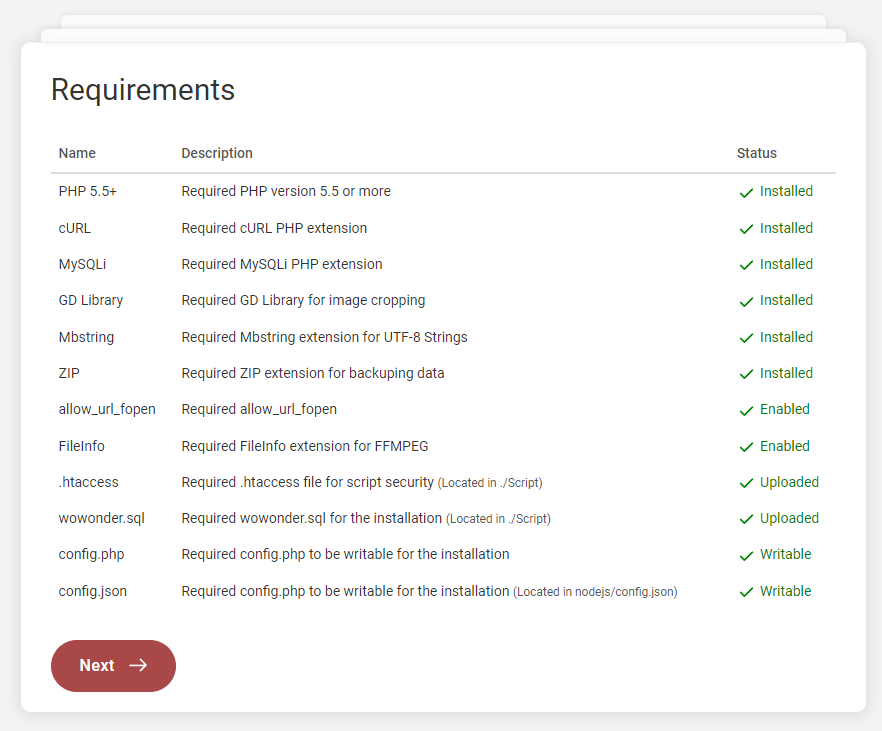
Important! Before we start the installation, please make sure you have the following installed on your server:
-
In the second page, make sure to fill the required data:
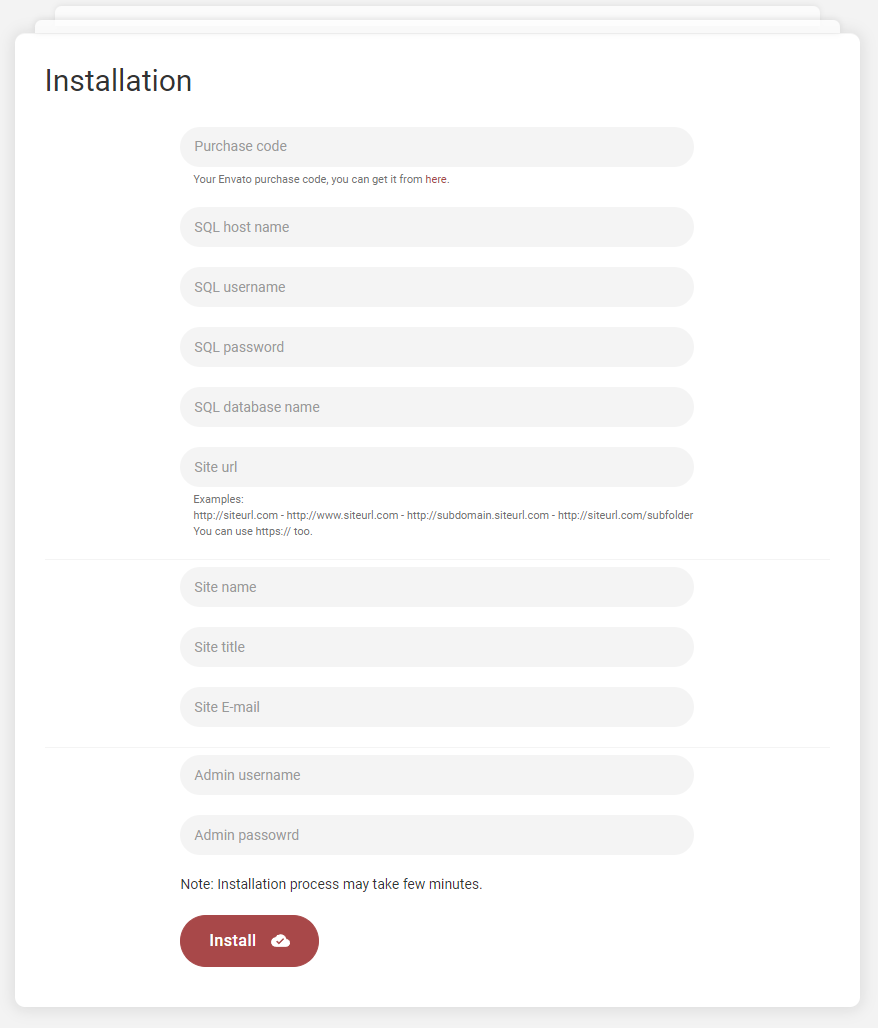
- Purchase Code - Envato purchase code. What is this?
- SQL Host name - MySQL host name, e.g: localhost
- SQL Username - MySQL username.
- SQL Password - MySQL user password.
- SQL Database - MySQL database name.
-
Site URL - Your Website URL, examples:
- https://siteurl.com
- https://www.siteurl.com
- https://siteurl.com
- https://subdomain.siteurl.com
- http://localhost
- https://siteurl.com/subfolder
- Site Name - Your site name, max 32 characters.
- Site Title - Your site title, max 100 characters.
- Site E-mail - Your site email, ex: info@yourdomain.com, Gmail or Hotmail is not supported. It should be one of your server's emails.
- Admin Password- Choose your admin password.
- Once you have wrote the information, please click the install button and wait for a while, the installation process may take up to 5 minutes.
- We are ready to go!
Hmm, using Nginx? if your server is using Nginx, please follow the last steps below:
- Open your server's root nginx.conf file, most of the time It's located it in: /etc/nginx/nginx.conf
- Open the home directory of the script, you should be able to find this file nginx.conf.
- Open the located file, and copy its content to your root nginx.conf file: /etc/nginx/nginx.conf
- If you find it something difficult to do, please contact your hosting provider, and they will do it for you easily.
What's Next?
- Open linux terminal or login thru SSH.
- Run:
crontab -e - Add this code to the list:
*/5 * * * * php -f {PATH_TO_SCRIPT_FROM_ROOT}/cron-job.php > /dev/null 2>&1. - Replace {PATH_TO_SCRIPT_FROM_ROOT} with the full path to the file, e.g:
/home/playtube/public_html/cronjob.php - Save and exit.
- If you are using cPanel, please follow these steps and replace the file name with cron-job.php, and make sure the cronjob run once every 5 minutes.
How to Setup SSL?
- Open .htaccess file located in root directory.
-
To redirect your website to SSL, copy and paste the code below after RewriteEngine On
RewriteCond %{HTTPS} off RewriteRule (.*) https://%{HTTP_HOST}%{REQUEST_URI} [R,L] -
To redirect your website to www, copy and paste the code below after RewriteEngine On
RewriteCond %{HTTP_HOST} ^[^.]+\.[^.]+$ RewriteCond %{HTTPS}s ^on(s)| RewriteRule ^ http%1://www.%{HTTP_HOST}%{REQUEST_URI} [L,R=301] - If you made any changes above, last step is to update your domain name in
config.phpfile.
Color Schemes
You can change your Website's Color Scheme in an instant. You can edit from these locations:
-
Main red colors from
Admin Panel -> Design -> Change Site Design -
./themes/wowonder/stylesheet/style.css -
./themes/wowonder/stylesheet/style.css
Logo & Favicon Settings
The Logo Can Be Changed From Admin Panel -> Design -> Change Site Design
General Setup
A setup guide on configuring 3rd party services.
How to setup SMTP?
- The first step of the process is to create an email account on your hosting package. This will be required for the SMTP configuration of your WoWonder website and it will also ensure that all emails from your website are successfully delivered to your users. You can create a new email account via cPanel.
- Once you have your email account created, you can proceed with the actual configuration of your WoWonder website. You need to access your website as administrator and go to SMTP settings from
Admin Panel -> Settings -> E-mail & SMS Setup -> E-mail Configuration -
Edit the following options:
- Server Type - Choose SMTP from the drop-down box
- SMTP Host -mail.example.com (change example.com to your actual domain)
- SMTP Username - Enter the email account created in the previous chapter
- SMTP Password - Enter the password for your email account
- SMTP Port - SMTP server port, most used 587 for TLS, and 465 for SSL encryption
- SMTP Encryption - Choose SMTP encryption method
-
I made the changes above but my website is not sending any emails, what I can do?
- Please test your SMTP credentials at SMTPER, if the same config worked by the test, please contact us.
How to setup FFMPEG?
- We have included a patched version of FFMPEG in the script, located in ./ffmpeg folder.
- Go to
Admin Panel -> File Upload Configuration -> FFMPEG System Settings - Enable FFMPEG, the default path for FFMPEG will be ./ffmpeg/ffmpeg
- Chmod and change file permission of ./ffmpeg/ffmpeg to 0777
- Now, find Debug FFMPEG, click debug and see the results.
- If the video file was converted after debugging, then everything is ready, you can ignore the below steps.
-
If you get broken video file, then you'll need to use your own server ffmpeg library, to install ffmpeg on your server, follow these links:
- How to install ffmpeg on Centos 7? Click Here.
- How to install ffmpeg on Centos 8? Click Here.
- How to install ffmpeg on Ubuntu? Click Here.
- How to install ffmpeg on debian? Click Here.
-
Once you done with the installation, go back to
Admin Panel -> File Upload Configuration -> FFMPEG System Settings& Edit the following options:- FFmpeg binary file path - Write the path you installed ffmpeg on your server, mostly will be
/usr/bin/ffmpegorffmpeg
- FFmpeg binary file path - Write the path you installed ffmpeg on your server, mostly will be
- Debug FFMPEG again, it should work fine.
- Important: Make sure shell_exec PHP function is enabled on your server.
- Try to upload videos to your website, if the video has been converted, then your site is ready!
How to setup NodeJS?
- You need to install NodeJS on your server to proceed, for more information about how to install nodejs, please read this documentation
- Install npm on your server.
- Once installed, You need to whitelist your nodejs port number, for more infromation, please take a look here
- Go to
Admin Panel -> Settings -> NodeJS Settings - Enable NodeJS
- If you are using SSL, enable NodeJs SSL Connection
- Enable Live Notification Bar
- NodeJS HTTP Port - Enter nodejs server's port number.
- NodeJs HTTPS (SSL) Port - Enter nodejs SSL server's port number (default 449)
- NodeJs SSL Certificate Key Path - Set the path to your domain SSL key path, .key
- NodeJs SSL Certificate Path - Set the path to your domain SSL key path, .crt or .pem
- To run your nodejs application on server boot and always, please take a look here: https://github.com/Unitech/pm2, replace app.js with main.js
- If you want to run the nodejs application, cd to ./nodejs folder and run
node main.js
How to setup OneSignal?
- Sign in to the Onesignal Console at https://onesignal.com/.
- Click on New App/Website
- Choose your app name and platform then click next.
- Fill the form with your website infromation, then click save.
- In next page, ignore the page and click on Finish.
- On top navbar, click on Keys & IDs
- Grab your OneSignal App ID & Rest API Key then go to
Admin Panel -> API Settings -> Push Notifications Settings -
Edit the following options for Android & IOS:
- OneSignal APP ID - Enter the OneSignal App ID you created in the previous chapter
- REST API Key - Enter the Rest API Key you created in the previous chapter
- Note: Every platform requires a new app, for example you need to create a separate app for Android, and another one for IOS.
How to get Google reCaptcha key?
- Sign in to the Google reCaptcha Admin at https://www.google.com/recaptcha/admin.
- On the top right corner, click on the plus + icon.
- Fill the required infromation ahd choose reCaptcha v2, once selected choose "I'm not a robot" Checkbox
- Add your domain name, then click submit.
- Click on Subscribe to Test
- Fill the information then add the API to your app we created above.
- Grab and copy SITE KEY .
- Grab and copy SITE SECRET .
-
Go to
Admin Panel -> Settings -> General Configuration -> Login & RegistrationEdit the following options:- Enable reCaptcha by clicking on the toggle.
- Recaptcha Key - Enter the site key you created in the previous chapter.
- Recaptcha Secret Key - Enter the secret site key you created in the previous chapter.
How to get YouTube API Key?
- Go to the Google API Manager console and log in using your Google credentials.
- After this click on Create Project link for create new project.
- Enter Project Name and click on Create button.
- Select the project from the dropdown menu beside Google Cloud Platform.
- Click on APIs & Services then click on +ENABLE APIS AND SERVICES .
- Search for YouTube Data API v3 and enable YouTube Data API v3.
- Once enabled, click on Credentials, on the top nav-bar, click on +Create credentials then click on API key
- Grab the key and Click Close.
-
Go to
Admin Panel -> Settings -> Website Information -> Features API Keys & Information, and edit the following options:- YouTube API Key - Enter the API key you created in the previous chapter.
How to get Google Maps Key?
- Go to the Google API Manager console and log in using your Google credentials.
- After this click on Create Project link for create new project.
- Enter Project Name and click on Create button.
- Select the project from the dropdown menu beside Google Cloud Platform.
- Click on APIs & Services then click on +ENABLE APIS AND SERVICES .
- Search for Maps Embed API and enable it.
- Search for Maps Static API and enable it.
- Search for Maps JavaScript API and enable it.
- Once enabled, click on Credentials, on the top nav-bar, click on +Create credentials then click on API key
- Grab the key and Click Close.
-
Go to
Admin Panel -> Settings -> Website Information -> Features API Keys & Information, and edit the following options:- Google Map API - Enter the API key you created in the previous chapter.
How to get Google Translate Key?
- Go to the Google API Manager console and log in using your Google credentials.
- After this click on Create Project link for create new project.
- Enter Project Name and click on Create button.
- Select the project from the dropdown menu beside Google Cloud Platform.
- Click on APIs & Services then click on +ENABLE APIS AND SERVICES .
- Search for Cloud Translation API and enable it.
- Once enabled, click on Credentials, on the top nav-bar, click on +Create credentials then click on API key
- Grab the key and Click Close.
-
Go to
Admin Panel -> Settings -> Website Information -> Features API Keys & Information, and edit the following options:- Google Translate API - Enter the API key you created in the previous chapter.
How to get Yandex Translation API key?
- Go to the Yandex API Manager console and log in using your Yandex credentials.
- You need to update your information and enter your credit / debit card information.
- Click Create new key in the top panel.
- Click Create API key.
- Enter a description of the key so that you can easily find it in the management console.
- Copy the ID.
- Grab the key and Click Close.
-
Go to
Admin Panel -> Settings -> Website Information -> Features API Keys & Information, and edit the following options:- Yandex Translation API - Enter the API key you created in the previous chapter.
How to get Yandex Maps API key?
- Go to the Yandex API Manager console and log in using your Yandex credentials.
- Click the Get key button
- Enter the key name and connect services JavaScript API, Geocoding API.
- Copy the API key.
-
Go to
Admin Panel -> Settings -> Website Information -> Features API Keys & Information, and edit the following options:- Yandex Map API key - Enter the API key you created in the previous chapter.
How to get Giphy API key?
- Create a GIPHY API Key by clicking Create an App on the https://developers.giphy.com/dashboard/ (you need to create an account first).
- Choose SDK and click Next Step.
- Enter Your App Name, App Description and click on Create App button.
- Grab the API key.
-
Go to
Admin Panel -> Settings -> Website Information -> Features API Keys & Information, and edit the following options:- Giphy API - Enter the API key you created in the previous chapter.
How to get Adult Image Filtration (Google Vision) API key?
- Go to the Google API Manager console and log in using your Google credentials.
- After this click on Create Project link for create new project.
- Enter Project Name and click on Create button.
- Select the project from the dropdown menu beside Google Cloud Platform.
- Click on APIs & Services then click on +ENABLE APIS AND SERVICES .
- Search for Cloud Vision API and enable it.
- Once enabled, click on Credentials, on the top nav-bar, click on +Create credentials then click on API key
- Grab the key and Click Close.
-
Go to
Admin Panel -> Settings -> Post Settings -> Post Settings -> Adult Images Settings, and edit the following options:- Enable Adult Images Filtration by clicking on the toggle.
- Vision API key - Enter the API key you created in the previous chapter.
How to enable weather widget and get OpenWeatherMap API?
- Go to the Weather API console and log in using your OpenWeather credentials (Or create account).
- Once you are logged in, go to https://home.openweathermap.org/api_keys.
- Find Create key and enter your website name then click Generate.
- Grab the key from the left table.
-
Go to
Admin Panel -> Manage Website Features -> Enable / Disable Features -> Weather Widget, and edit the following options:- Enable Weather Widget by clicking on the toggle.
- Weather APP ID - Enter the API key you created in the previous chapter.
How to enable OpenAI and get OpenAI API?
- Go to the OpenAI API console and log in using your credentials (Or create account).
- Find Create new secret key button click it.
- Grab the key.
- Make sure to enable billing from https://platform.openai.com/account/billing/overview
-
Go to
Admin Panel -> Settings -> AI Settings -> OpenAI Settings, and edit the following options:
How to enable Replicate AI and get Replicate API?
- Go to the Replicate API console and log in using github account.
- Find Account on top right corner.
- Find API token field and grab the key.
- Make sure to enable billing from the tab beside generl: https://prnt.sc/x88vWFlDMGH8
-
Go to
Admin Panel -> Settings -> AI Settings -> Replicate AI Settings, and edit the following options:- Replicate API Token - Enter the API key you created in the previous chapter.
- Choose the Replicate Model you wish to use, you can explore them here:
How to setup Facebook social login plugin?
- Log in to your Facebook account.
- Go to Facebook for Developers, click on My Apps and press Create App.
- Select Consumer. and click Next.
- Set the Display Name of your application.
- Enter the Contact Email.
- Click on Create App.
- Navigate to Facebook Login and press the Set up button.
- Select Web from the displayed platforms.
- Go to the Settings on the left nav bar section and choose Basic.
-
In the appeared menu some of the fields are generated automatically. All you need to do is fill in the rest of them, such as App Domains, Contact Email, Privacy Policy URL, Terms Of Service in particular.
- App Domains - Enter your domain name, without http or https (example.com, www.example.com).
- Privacy Policy URL Enter your website's privacy policy URL (example.com/terms/privacy).
- Terms of Service URL Enter your website's Terms of Service URL (example.com/terms/terms).
- User Data Deletion Enter your website's Terms of Service URL (example.com/terms/terms).
- Category - Choose your app category.
- Click on Save changes.
- Go to the left nav bar section and choose Facebook Login then click on Settings .
- Scroll down a bit and find Valid OAuth Redirect URIs
-
Add the following Redirect URIs:
https://yourwebsite.com/login-with.php?provider=Facebookhttps://www.yourwebsite.com/login-with.php?provider=Facebook
- Click on Save changes
-
On the top you'll see this message Your app has Standard Access to public_profile. To use Facebook Login, switch public_profile to Advanced Access Click on Get Advanced Access
- Enter email in the search box, then click Get Advanced Access, confirm the form.
- Enter public_profile in the search box, then click Get Advanced Access, confirm the form.
-
Last step is to set the app mode to Live
- On the top navbar, you'll find App Mode, click the toggle and set the app to Live
- Complete Data Use Checkup (If required)
- Again, go to the Settings on the left nav bar section and choose Basic.
- Grab and copy App ID and App Secret.
-
Go to
Admin Panel -> Settings -> Social Login Settings -> Facebook Configuration& Edit the following options:- Application ID - Enter the App ID.
- Application Secret Key - Enter the App Secret.
- Enable Facebook Login.
This means, if you go to your website and then check the URL in the browser and the URL does look like http://www.domain.com then you need to enter the exact same URL. If your website URL is http://domain.com then you need to enter it that way, without using the www at the front of the name.
Use the same URL for the Valid OAuth Redirect URIs field.
If these entries do not completely match the URL of your website, the application won’t work and it will show an error message when you try to connect to the App.
How to setup Twitter social login plugin?
- Go to apps.twitter.com and click on Sign In in the top right. Log in using your personal Twitter credentials.
- Apply for API access: https://developer.twitter.com/en/apply-for-access, without this process you can't create any apps.
- If this is your first time creating an App on Twitter. You will see a button to Create an app
-
On the Create an application page, fill out all the information Twitter is asking for.
- App Name - Enter your website name.
- Application description - Enter your website description.
- Website URL - Enter your domain name, without http or https (example.com, www.example.com).
- Enable and click on Enable Sign with Twitter.
-
Callback URLs - Enter Redirect URIs, as following:
https://yourwebsite.com/login-with.php?provider=Twitterhttps://www.yourwebsite.com/login-with.php?provider=Twitter
- Privacy Policy URL - Enter your website's privacy policy URL (example.com/terms/privacy).
- Terms of Service URL - Enter your website's Terms of Service URL (example.com/terms/terms).
- Tell us how this app will be used - Fill the infromation.
-
After you successfully created the Twitter application you’ll be redirected to its Details Tab. click on the Permissions tab. In this tab you will find a Access option. please choose Read and Write from the list, scroll down and click on the Update Settings button to save your changes.
- Request email address from users option should be enabled for Social Login plugin.
- After you make sure, that the settings have been saved, go to the application’s API keys page by clicking on the Keys and Tokens tab.
- Grab and copy API key and API secret key.
-
Go to
Admin Panel -> Settings -> Social Login Settings -> Twitter Configuration& Edit the following options:- Consumer Key - Enter the API key.
- Consumer Secret - Enter the API secret key.
- Enable Twitter Login.
This means, if you go to your website and then check the URL in the browser and the URL does look like http://www.domain.com then you need to enter the exact same URL. If your website URL is http://domain.com then you need to enter it that way, without using the www at the front of the name.
Use the same URL for the Callback URL field.
If these entries do not completely match the URL of your website, the application won’t work and it will show an error message when you try to connect to the App.
How to setup Google+ social login plugin?
- Go to the Google API Manager console and log in using your Google credentials.
- After this click on Create Project link for create new project.
- Enter Project Name and click on Create button.
- Select the project from the dropdown menu beside Google CLoud Platform.
- Click on APIs & Services then click on +ENABLE APIS AND SERVICES .
- Search for Google+ and enable Google+ API.
- Once enabled, click on Credentials, on the top nav-bar, click on +Create credentials then click on Oauth client ID
-
In OAuth consent screen page, choose External, fill the form and click Save and Continue.
- In Authorized domains section, make sure to add your own domain name with or without www.
-
On the next page, you'll see the button Add or remove scopes, click on it.
- Look for auth/userinfo.email and select it.
- Look for auth/userinfo.profile and select it.
- Scroll down and click on UPDATE.
- If you successfully added the new scopes, click on SAVE AND CONTINUE.
- Ignore the Test users section and click on SAVE AND CONTINUE.
- Scroll down and click on BACK TO DASHBOARD.
- On the next page, click on PUBLISH APP and publish your application.
-
On the left nav bar, click on Credentials, on the top nav-bar, click on +Create credentials then Oauth client ID
- In Application type, choose web application.
-
In Authorized redirect URIs, add the following URIs:
https://yourwebsite.com/login-with.php?provider=Googlehttps://www.yourwebsite.com/login-with.php?provider=Google
- Click on Create then you'll see your Client ID and Client secret, copy those keys and headback to your website.
-
Go to
Admin Panel -> Settings -> Social Login Settings -> Google+ Configuration& Edit the following options:- Client ID - Enter the Client ID.
- Client secret - Enter the Client secret.
- Enable Google+ Login.
This means, if you go to your website and then check the URL in the browser and the URL does look like http://www.domain.com then you need to enter the exact same URL. If your website URL is http://domain.com then you need to enter it that way, without using the www at the front of the name.
Use the same URL for the Authorized redirect URIs field.
If these entries do not completely match the URL of your website, the application won’t work and it will show an error message when you try to connect to the App.
How to setup LinkedIn social login plugin?
- Go to the LinkedIn developer site: https://developer.linkedin.com/ .
- Click the Create App button on the banner.
-
To correctly create the application, please fill in the application sections, which are explained below.
- App Name - Enter a name for your application.
- LinkedIn Page - Select an existing company or choose a New Company. If you select the new company, you will be asked to enter a company name.
- Privacy policy URL - Enter your website's privacy policy URL (example.com/terms/privacy).
- App logo - Upload an icon for your application.
- Click on Create app.
- On the app page, scroll down, you'll find Additional settings, look for Domains and add your own domain name.
- On same page, scroll up and click on Auth.
-
In Authorized redirect URLs for your app, add the following URIs:
https://yourwebsite.com/login-with.php?provider=Linkedinhttps://www.yourwebsite.com/login-with.php?provider=Linkedin
- On the Auth page, you'll find Client ID and Client secret, copy those keys and headback to your website.
-
Go to
Admin Panel -> Settings -> Social Login Settings -> LinkedIn Configuration& Edit the following options:- Application ID - Enter the Client ID.
- Application Secret Key - Enter the Client secret.
- Enable LinkedIn Login.
This means, if you go to your website and then check the URL in the browser and the URL does look like http://www.domain.com then you need to enter the exact same URL. If your website URL is http://domain.com then you need to enter it that way, without using the www at the front of the name.
Use the same URL for the Authorized redirect URLs for your app field.
If these entries do not completely match the URL of your website, the application won’t work and it will show an error message when you try to connect to the App.
How to setup Vkontakte social login plugin?
- Go to the VK developers page: https://vk.com/apps
- Click on Create.
- On Platform, select Website, and add your own domain name.
-
To correctly create the application, please fill in the application sections, which are explained below.
- Title - Enter a name for your application.
- Description - Select an existing company or choose a New Company. If you select the new company, you will be asked to enter a company name.
- Terms and Conditions URL - Enter your website's privacy policy URL (example.com/terms/terms).
- Privacy policy URL - Enter your website's privacy policy URL (example.com/terms/privacy).
- App logo - Upload an icon for your application.
- Click on Save.
- On the left sidebar, click on Settings
-
In this page, look for Authorized redirect URI, add the following URIs:
https://yourwebsite.com/login-with.php?provider=Vkontaktehttps://www.yourwebsite.com/login-with.php?provider=Vkontakte
- In the same page, you'll find App ID and Secure key, copy those keys and headback to your website.
-
Go to
Admin Panel -> Settings -> Social Login Settings -> Vkontakte Configuration& Edit the following options:- Application ID - Enter the App ID.
- Application Secret Key - Enter the Secure key.
- Enable Vkontakte Login.
This means, if you go to your website and then check the URL in the browser and the URL does look like http://www.domain.com then you need to enter the exact same URL. If your website URL is http://domain.com then you need to enter it that way, without using the www at the front of the name.
Use the same URL for the Authorized redirect URI field.
If these entries do not completely match the URL of your website, the application won’t work and it will show an error message when you try to connect to the App.
How to setup Discord social login plugin?
- Visit Discord developer portal and sign in with your discord app developer account.
- On the page, Click on the New Application button and enter a Name for your app. Click on Save.
- Click on OAuth2 form left section.
-
Click on Add redirect and Enter Callback URL in that (Redirects), add the following URIs:
https://yourwebsite.com/login-with.php?provider=Discordhttps://www.yourwebsite.com/login-with.php?provider=Discord
- In the same page, you'll find Client Id and Client Secret, copy those keys and headback to your website.
-
Go to
Admin Panel -> Settings -> Social Login Settings -> Discord Configuration& Edit the following options:- Application ID - Enter the App ID.
- Application Secret Key - Enter the Secure key.
- Enable Discord Login.
This means, if you go to your website and then check the URL in the browser and the URL does look like http://www.domain.com then you need to enter the exact same URL. If your website URL is http://domain.com then you need to enter it that way, without using the www at the front of the name.
How to setup Mailru social login plugin?
- Go to https://o2.mail.ru/app and sign in with your Mail.ru app developer account.
- Go to Apps and click on Create an Application.
- Enter App name in Project name field.
-
Enter Redirect URI, add the following URIs:
https://yourwebsite.com/login-with.php?provider=Mailru
- Click on Connect Site
- On the same page you will get your Client ID and Client Secret under the Editing the Application section.
-
Go to
Admin Panel -> Settings -> Social Login Settings -> Mailru Configuration& Edit the following options:- Application ID - Enter the Client ID.
- Application Secret Key - Enter the Client secret.
- Enable Mailru Login.
This means, if you go to your website and then check the URL in the browser and the URL does look like http://www.domain.com then you need to enter the exact same URL. If your website URL is http://domain.com then you need to enter it that way, without using the www at the front of the name.
How to setup WoWonder social login plugin?
If you are using WoWonder script, you can integrate your site with WoWonder.
- Login into your website that is using WoWonder script as admin.
- Go to https://yourwebsite.com/create-app, replace yourwebsite.com with your own domain name.
-
To correctly create the application, please fill in the application sections, which are explained below.
- Name - Your application name. This is used to attribute the source user-facing authorization screens. 32 characters max.
- Domain - Enter your website URL (That is using WoWonder Script).
- Redirect URI -
https://yourwebsite.com/wo_login.php, replace yourwebsite.com with your own domain name (That is using WoWonder Script). - Description - Your application description, which will be shown in user-facing authorization screens. Between 10 and 200 characters max.
- Image - Upload an icon for your application.
- Click on Create.
- Get your App ID and App Secret.
-
Go to
Admin Panel -> Settings -> Social Login Settings -> WoWonder Configuration& Edit the following options:- API Key - Enter the App ID.
- API Secret - Enter the App Secret.
- WoWonder Domain - Enter your website URL (That is using WoWonder Script).
- WoWonder Icon - Enter your icon image URL (That is using WoWonder Script), example:
https://demo.wowonder.com/themes/default/img/icon.png - Enable WoWonder Login.
How to setup Instagram social login plugin?
Unfortunately, Instagram is not accepting any new applications anymore.
- Although not detailed in this configuration guide, you can create a new QQ app that enables users to log on to your web site by using their QQ account. To create a QQ developer account, you must complete a registration process that includes such tasks as providing a copy of your business license.
- If you already have a QQ developer account, you can create a social login app from the QQ developer’s site https://connect.qq.com
- Although not detailed in this configuration guide, you can create a new WeChat app that enables users to log on to your web site by using their WeChat account. To create a WeChat developer account, you must complete a lengthy application process that requires supplying information such as your personal ID and business license
- If you already have a WeChat developer account, you can create a social login app from the WeChat developer’s site https://open.wechat.com/
Payment Gateways Setup
WoWonder comes with a lot of payment gateways
Here is a setup guide on configuring payment gateways.
Stripe
- Go to Stripe & create a new account.
- Login to your dashboard & turn your account on by flipping the switch from “Test” to “Live”.
- Click Activate Account in the pop up window to fill out the standard business details Stripe needs to send you payments.
- Once you’ve completed the entire form, click Activate Account.
- Now that your account is live, go to Your Account and click on Account Settings.
- Click the API Keys tab & copy the Live Secret Key & Publishable Key.
-
Go to
Admin Panel -> Payments & Ads -> Payment Configuration, find Stripe and edit the following options:- Enable Stripe Payment Method by clicking on the toggle.
- Stripe API Secret Key - Your Stripe secret key that starts with sk_
- Stripe Publishable Key - Your Stripe publishable key that starts with pk_
PayPal
- Login to PayPal, then click here: https://developer.paypal.com/developer/applications/create
- Set your app name, email address then click Create App.
- On the top right side, you can see two tabs, SandBox and Live, Choose Live.
-
Go to
Admin Panel -> Payments & Ads -> Payment Configuration, find PayPal and edit the following options:- Enable PayPal Payment Method by clicking on the toggle.
- PayPal Mode - Choose Live (In case your app is in Live mode).
- PayPal Clinet ID - PayPal application ID you created in the previous chapter.
- PayPal Secret Key - PayPal application secret key you created in the previous chapter.
CashFree
- Go to Cashfree website & sign in to your account with a registered email address.
- Click on Activate button to activate various payment gateways for your account.
- Now, you can click on View Dashboard to view account details.
- Go to Credentials tab to access the test API credentials for payment gateways.
- Click on Get Credentials tab to access the sandbox credentials
- View app ID & secret key under Test Credentials tab.
-
Go to
Admin Panel -> Payments & Ads -> Payment Configuration, find CashFree and edit the following options:- Enable CashFree Payment Method by clicking on the toggle.
- CashFree Mode - Choose Live (In case your app is in Live mode).
- Client ID - CashFree application ID you created in the previous chapter.
- Client Secret - CashFree application secret key you created in the previous chapter.
RazorPay
- Go to the Razorpay website and Sign Up.
- Enter your work email address and a password for your Razorpay account and click Create Account.
- Fill Pre-sign Up Form
- Verify Email Address
- Once your account is created, you have access to the Test mode on the Dashboard. Test mode is used for testing purposes and does not involve actual money transactions. However, you would need to activate your account in order to accept live payments.
- To create an Application, follow this RazorPay Guide.
-
Once your application was created, take the required keys then go to
Admin Panel -> Payments & Ads -> Payment Configuration, find RazorPay and edit the following options:- Enable RazorPay Payment Method by clicking on the toggle.
- Application ID - CashFree application ID you created in the previous chapter.
- Application Secret - CashFree application secret key you created in the previous chapter.
PayStack
- Sign Up with Paystack
- Verify your sign up using a verification link sent to your email.
- The next thing is to sign in to your new Paystack account
- On your Dashboard you will find your public and secret key
-
Grab the keys, then go to
Admin Panel -> Payments & Ads -> Payment Configuration, find PayStack and edit the following options:- Enable PayStack Payment Method by clicking on the toggle.
- Secret Key - CashFree application secret key you created in the previous chapter.
PaySera
- Sign up with PaySera then Log in to your account. In the menu on the left choose Settings > Profile Settings > Service management > Change.
- Select Collection of payments online via e-banking and other systems and click on Order
- In the left menu please select Projects and Activities > My projects and click on Add a new project.
- In the opened window, enter data of a new project: In the section Service provider enter your online domain name.
- If you are not using any platform, select I will enter the project address manually and enter the website address.
- If you are using a platform, then in the section I will use a platform, a list of platforms will be provided and, after selecting one of them, the address used will be entered automatically.
- In the section Service description briefly describe the services you provide. If you are selling physical goods, enter the refund policy and delivery terms. More information on the description of the project is provided here.
- You can change the information and service description later as needed: Enter the current phone number and email address in the section Contact details. If required, also specify other contact details, e.g. Skype. These contact details will be provided to your buyers together with a payment confirmation letter. The project ownership confirmation code is provided in the section Project confirmation; you should paste it in your website’s head section. This way we will be sure that you are the real owner of the website. Having completed the requested information, click on Save project.
- Make sure that the website already contains purchase and sale, delivery and refund terms, privacy policy and your contact details as a merchant. Submit the project for review only when the website has been fully prepared to be used by clients, the payment platform has been integrated and test payments have been performed. Your submitted project will be reviewed within one day.
-
After creating a project, you will be provided with the data necessary for the technical integration of the payment platform
- In the menu on the left under Projects and Activities > My projects you will find the project ID (Project number/projectid);
- In the menu on the left under Projects and Activities > My projects click on Project settings > General project settings and you will find the code required to confirm ownership of your website;
- In the menu on the left under Projects and Activities > My projects click on Project settings > General project settings and you will find your project password.
-
Go to
Admin Panel -> Payments & Ads -> Payment Configuration, find PaySera and edit the following options:- Enable PaySera Payment Method by clicking on the toggle.
- PaySera Mode - Choose Live (In case your app is in Live mode).
- Project ID - PaySera project ID you created in the previous chapter.
- Account Password - Your PaySera project password.
Iyzipay
- Create an account in Iyzipay
- You can access the API and Security Key values, where you can test the services from the Settings menu, without the need for email activation
- Grab the keys then go to
Admin Panel -> Payments & Ads -> Payment Configurationpaste the keys in Iyzipay form and fill the rest of the infromation.
2Checkout
- Go to: https://secure.2checkout.com/cpanel/ and Sign in with your 2Checkout live account or create a new one.
- Now click on Integrations -> Webhooks & API and from API section, copy Merchant Code, Publishable Key and Private Key
-
Go to
Admin Panel -> Payments & Ads -> Payment Configuration, find 2checkout and edit the following options:- Enable 2checkout Payment Method by clicking on the toggle.
- 2checkout Mode - Choose Live (In case your app is in Live mode).
- Seller ID - Your Merchant ID.
- Publishable Key - Publishable Key you copied in the previous chapter.
- Private Key - Private Key you copied in the previous chapter.
Authorize.Net
- Log into the Merchant Interface.
- Click Account from the main toolbar.
- Click Settings in the main left-side menu.
- Click API Credentials & Keys.
Select New Transaction Key.
Note: When obtaining a new Transaction Key, you may choose to disable the old Transaction Key by clicking the box titled, Disable Old Transaction Key Immediately. You may want to do this if you suspect your previous Transaction Key is being used fraudulently.- Click Submit to continue.
- Request and enter PIN for verification.
- Your new Transaction Key is displayed.
- If the Disable Old Transaction Key Immediately box is not checked, the old Transaction Key will automatically expire in 24 hours. When the box is checked, the Transaction Key expires immediately.
-
Go to
Admin Panel -> Payments & Ads -> Payment Configuration, find Authorize.net and edit the following options:- Enable Authorize.net Payment Method by clicking on the toggle.
- Authorize.net Mode - Choose Live (In case your app is in Live mode).
- Authorize.Net API LOGIN ID - Your API Login ID.
- Authorize.Net TRANSACTION KEY - TRANSACTION KEY you copied in the previous chapter.
SecurionPay
- You can find a detailed doc here: https://securionpay.helpjuice.com/90032-backoffice/529474-api-keys
-
Once you got your keys, Go to
Admin Panel -> Payments & Ads -> Payment Configuration, find Securionpay and edit the following options:- Enable Securionpay Payment Method by clicking on the toggle.
- Securionpay Public key - Your Public key you copied in the previous chapter.
- Securionpay Secret key - Secret Key you copied in the previous chapter.
Yoomoney (Yandex)
- How to get your secret key: https://yookassa.ru/docs/support/merchant/payments/implement/keys?lang=en
-
Once you got your keys, Go to
Admin Panel -> Payments & Ads -> Payment Configuration, find Yoomoney and edit the following options:- Enable Yoomoney Payment Method by clicking on the toggle.
- Yoomoney Wallet ID - Your wallet ID.
- Secret key - Secret Key you copied in the previous chapter.
CoinBase
- Go to CoinBase commerce https://commerce.coinbase.com/, login or create account.
- Once you are logged in, go to https://commerce.coinbase.com/dashboard/settings
- Scroll down, find API keys then Click on Create an API key
- Click on Create API
- Grab the new API key
-
Once you got your key, Go to
Admin Panel -> Payments & Ads -> Payment Configuration, find CoinBase and edit the following options:- Enable CoinBase Payment Method by clicking on the toggle.
- API key - Your Public key you copied in the previous chapter.
CoinPayments
- Go to CoinPayments https://www.coinpayments.net/register, and create a new account.
- Once you are logged in, go to https://www.coinpayments.net/acct-api-keys
- Scroll down, and click Generate new key...
- Copy both Public Key and Private Key.
- Click on Edit Permissions and scroll down to API Key Permissions
- Enable the following: get_basic_info, set_basic_info, get_tx_info, create_transfer, get_conversion_info then click on Update Permissions
- Grab the new API keys
-
Once you got your keys, Go to
Admin Panel -> Payments & Ads -> Payment Configuration, find CoinPayments and edit the following options:- Enable CoinPayments Payment Method by clicking on the toggle.
- Merchant ID - Your account Merchant ID, you can get this ID from your account settings.
- Secret Key - Your Public key you copied in the previous chapter.
Storage Configuration
Here is a setup guide on configuring third party storages.
How to setup Amazon S3 Storage?
- Sign in to the AWS Management Console and open the Amazon S3 console at https://console.aws.amazon.com/s3/.
- Choose Create bucket.
- In Bucket name, enter a DNS-compliant name for your bucket.
- In Region, choose the AWS Region where you want the bucket to reside.
- Under Object Ownership, choose ACLs disabled.
- Choose Create bucket & You've created a bucket in Amazon S3.
-
Also make sure you added the Bucket Policy by adding this JSON code in Bucket Policy, You need to replace YOUR-BUCKET-NAME with your Bucket Name.
{ "Version": "2008-10-17", "Statement": [ { "Sid": "AllowPublicRead", "Effect": "Allow", "Principal": { "AWS": "*" }, "Action": "s3:GetObject", "Resource": "arn:aws:s3:::YOUR-BUCKET-NAME/*" } ] } -
Also make sure you have configered the CORS configuration by adding this JSON code below:
[ { "AllowedHeaders": [ "Authorization" ], "AllowedMethods": [ "GET" ], "AllowedOrigins": [ "*" ], "ExposeHeaders": [], "MaxAgeSeconds": 3000 } ] -
Next step is to get Security credentials.
- Open the IAM console at https://console.aws.amazon.com/iam/
- On the navigation menu, choose Users.
- Choose your IAM user name (not the check box).
- Open the Security credentials tab, and then choose Create access key.
-
To see the new access key, choose Show. Your credentials resemble the following:
- Access key ID:
AKIAIOSFODNN7EXAMPLE - Secret access key:
wJalrXUtnFEMI/K7MDENG/bPxRfiCYEXAMPLEKEY
- Access key ID:
- Go to
Admin Panel -> File Upload Configuration -> Amazon S3 Configuration -
Edit the following options:
- Amazon Bucket Name - Your new bucket we created on the previous chapter
- Amazon S3 Key - Your account access key ID
- Amazon S3 Secret Key - Your account secret access key
- Amazon S3 bucket Region - Your new bucket region we created on the previous chapter
- if your website is freshly installed and still brand new, you can ignore the upload process below and press only on Test Connection
-
Transferring files from WoWonder to Amazon S3:
- If you already have WoWonder installed on your server, and you want to use Amazon, make sure to upload the whole "upload/" folder to your bucket.
- We recommend to upload the folder and files via S3cmd.
- Make sure to use
--acl-publicin your command line while uploading the files.
How to setup Digitalocean Storage?
- Sign in to the DigitalOcean Console at https://cloud.digitalocean.com/.
- You can create a Space from the Create menu by selecting Spaces. This will take you to the Create a Space page.
- Choose a datacenter region.
- Choose to restrict file listing.
- Choose a unique name for your Space.
- After choosing your settings, click Create a Space. This will take you to the newly-created Space’s Files tab, which displays the files and folders in its root.
-
Next step is to get Security credentials.
- Click on API on the left nav-bar.
- Under Spaces access keys, Click on Generate New Key.
- Grab the Key & secret key.
- Go to
Admin Panel -> File Upload Configuration -> Digitalocean Configuration -
Edit the following options:
- Digitalocean Space Name - Your new bucket we created on the previous chapter
- Digitalocean Key - Your account access key
- Digitalocean Secret - Your account secret access key
- Digitalocean bucket region - Your new bucket region we created on the previous chapter
- if your website is freshly installed and still brand new, you can ignore the upload process below and press only on Test Connection
-
Transferring files from WoWonder to Digitalocean:
- If you already have WoWonder installed on your server, and you want to use Digitalocean, make sure to upload the whole "upload/" folder to your bucket.
- We recommend to upload the folder and files via S3cmd, Setting Up s3cmd 2.x with DigitalOcean Spaces
- Make sure to use
--acl-publicin your command line while uploading the files.
How to setup BackBlaze Storage?
How to setup Google Cloud?
- Go to the Google API Manager console and log in using your Google credentials.
- After this click on Create Project link for create new project.
- Enter Project Name and click on Create button.
- Go to https://console.cloud.google.com/storage/browser.
- Click on Create Bucket, and fill the the form.
- At the top-left, click Menu > IAM & Admin > Service Accounts, Or go to https://console.cloud.google.com/iam-admin/serviceaccounts
- Click on Create service account, and fill the form.
- Click Keys > Add keys > Create new key.
- Select JSON, then click Create
- Your new public/private key pair is generated and downloaded to your machine as a new file. This file is the only copy of this key.
- Click Close
- Go to Google Cloud Settings from
Admin Panel -> File Upload Configuration -> Google Cloud Settings -
Edit the following options:
- Google Cloud Bucket Name - the bucket name you created.
- Google Cloud File - Choose the json file we just downloaded.
- Enable Google Cloud Storage
- if your website is freshly installed and still brand new, you can ignore the upload process below and press only on Test Connection
-
Transferring files from WoWonder to Cloud:
- If you already have WoWonder installed on your server, and you want to use Digitalocean, make sure to upload the whole "upload/" folder to your bucket.
How to setup FTP Storage?
- The first step of the process is to create an FTP account on your hosting package. This will be required for the FTP configuration of your WoWonder website and it will also ensure that all files from your website are successfully uploaded to your server. You can create a new FTP account via cPanel.
- Once you have your FTP account created, you can proceed with the actual configuration of your WoWonder website. You need to access your website as administrator and go to FTP settings from
Admin Panel -> File Upload Configuration -> FTP Settings -
Edit the following options:
- FTP Hostname - ftp.example.com (change example.com to your actual domain, or use your own domain name)
- FTP Username - Enter the FTP account you created in the previous chapter
- FTP Password - Enter the password for your FTP account
- FTP Port - Enter your FTP port number, default 21.
- FTP Path - Enter the path to /upload folder, default ./
- FTP Endpoint - (IP or domain where the FTP server is pointed to) example: storage.com, files will be surved from here.
- if your website is freshly installed and still brand new, you can ignore the upload process below and press only on Test Connection otherwise make sure to upload "upload/" folder to your FTP server.
How to setup Wasabi (FTP) Storage?
- Sign in to the Wasabi Console at https://wasabi.com/.
- Click On Create A bucket, and fill the required information, then create the bucket.
-
Enabling FTP/FTPS
- Click Settings on the Wasabi menu and open the FTP/FTPS drop-down.
- Slide the option to the right. The slide option is blue when FTP/FTPS is enabled. When FTP/FTPS is disabled, the option is gray
- A message indicates that FTP/FTPS does not comply with normal IAM policies, which could be a potential security risk.
- If you want to continue to enable FTP/FTPS, enter agree in the message area and then click TOGGLE.
- Note: The user name and password for FTP/FTPS usage is the same as the user name and password for the root account.
- Grab those info, then go to
Admin Panel -> File Upload Configuration -> FTP Settings -
Edit the following options:
- FTP Hostname - region.wasabisys.com (change region to your actual bucket region), Wasabi Region URLs
- FTP Username - Enter your Wasabi account username
- FTP Password - Enter your Wasabi account passsword
- FTP Port - 21.
- FTP Path - Enter the path to /upload folder, default ./
- FTP Endpoint - Your wasabi bucket Endpoint.
How to setup Wasabi (S3) Storage?
- Sign in to the Wasabi Console at https://wasabi.com/.
- Click On Create A bucket, and fill the required information, then create the bucket.
-
Getting the access keys:
- Go to https://console.wasabisys.com/#/access_keys
- Click on Create new access key
- A message indicates that your key was created, please download the file.
- Grab the access and secret keys from the downloaded file.
- Grab those info, then go to
Admin Panel -> File Upload Configuration -> Wasabi Configuration -
Edit the following options:
- Wasabi Bucket Name - Your new bucket we created on the previous chapter
- Wasabi Key - Your account access key
- Wasabi Secret - Your account secret access key
- Wasabi bucket region - Your new bucket region we created on the previous chapter
- if your website is freshly installed and still brand new, you can ignore the upload process below and press only on Test Connection
-
Transferring files from WoWonder to Wasabi:
- If you already have WoWonder installed on your server, and you want to use Wasabi, make sure to upload the whole "upload/" folder to your bucket.
- We recommend to upload the folder and files via S3cmd, Setting Up s3cmd 2.x with DigitalOcean Spaces
- Make sure to use
--acl-publicin your command line while uploading the files.
Video & Audio Chat
Here is a setup guide on configuring video and audio chat.
How to setup Twilio Video service?
- Log into your Twilio project at www.twilio.com/console. If you don't have account yet, create one.
- Click on https://console.twilio.com/us1/account/keys-credentials/api-keys.
- Click on Create API key and create the new key.
- Once done, you'll get SID, and Secret.
- Once copied the above keys, go to https://console.twilio.com/us1/account/manage-account/general-settings and copy Account SID
- Go to
Admin Panel -> Chat & Video/Audio -> Twilio API Configuration -
Edit the following options:
- Live accountSid - Your Account SID we got one previous chapter
- apiKeySid - Your API SID we got one previous chapter
- apiKeySecret - Your API Secret we got one previous chapter.
How to setup Agora (Video Chat) service?
- Sign up here to create an Agora account. After sign-up, you can log in here.
-
Once you finish the sign-up process, you can create an Agora project in Agora Console, To create an Agora project, do the following:
- Enter the Project Management page.
- Click Create.
- Follow the on-screen instructions to enter a project name and use case, and check Secured mode: APP ID + Token (Recommended) as the authentication mechanism.
- Click Submit. You can now see the project on the Project Management page.
- To copy the App ID, find your project on the Project Management page in Agora Console, and click the copy icon to the right of the App ID.
-
To get an App Certificate, do the following:
- On the Project Management page, click the edit icon for the project you want to use.
- Click the copy icon under Primary Certificate.
-
Generate a Customer ID and Customer Secret
- In Agora Console, click the account name in the top right corner, and click RESTful API from the drop-down list to enter the RESTful API page.
- Click Add a secret, and click OK. A set of Customer ID and Secret is generated.
- Click Download in the Customer Secret column. Read the pop-up window carefully, and save the downloaded
key_and_secret.txtfile in a secure location.
- Go to
Admin Panel -> Settings -> Chat & Video / Audio -> Agora API Configuration -
Edit the following options:
- App ID - Your APP ID we got one previous chapter
- App Certificate - Your App Certificate we got one previous chapter
- Customer ID - Enter the Customer ID you downloaded from key_and_secret.txt.
- Customer Secret - Enter the Customer ID you downloaded from key_and_secret.txt
Video Streaming
Here is a setup guide on configuring live streaming.
How to setup Agora (Live Streaming) service?
- Sign up here to create an Agora account. After sign-up, you can log in here.
-
Once you finish the sign-up process, you can create an Agora project in Agora Console, To create an Agora project, do the following:
- Enter the Project Management page.
- Click Create.
- Follow the on-screen instructions to enter a project name and use case, and check Secured mode: APP ID + Token (Recommended) as the authentication mechanism.
- Click Submit. You can now see the project on the Project Management page.
- To copy the App ID, find your project on the Project Management page in Agora Console, and click the copy icon to the right of the App ID.
-
To get an App Certificate, do the following:
- On the Project Management page, click the edit icon for the project you want to use.
- Click the copy icon under Primary Certificate.
-
Generate a Customer ID and Customer Secret
- In Agora Console, click the account name in the top right corner, and click RESTful API from the drop-down list to enter the RESTful API page.
- Click Add a secret, and click OK. A set of Customer ID and Secret is generated.
- Click Download in the Customer Secret column. Read the pop-up window carefully, and save the downloaded
key_and_secret.txtfile in a secure location.
- Go to
Admin Panel -> Settings -> Posts Settings -> Setup Live Streaming -> Agora API Configuration -
Edit the following options:
- App ID - Your APP ID we got one previous chapter
- App Certificate - Your App Certificate we got one previous chapter
- Customer ID - Enter the Customer ID you downloaded from key_and_secret.txt.
- Customer Secret - Enter the Customer ID you downloaded from key_and_secret.txt
How to setup Millicast service?
- Sign up https://dash.millicast.com/ to create an millicast account.
- Go to https://dash.millicast.com/#/tokens
- Click on the Plus Icon + to create a new token.
- Fill the required infromation, and click OK
- Once created, Click on the Settings Icon then select API
- Grab Account ID, and Publishing Token.
- Go to
Admin Panel -> Settings -> Posts Settings -> Setup Live Streaming -> Millicast API Configuration -
Edit the following options:
- Account ID - Account ID we got one previous chapter
- Publishing Token - Publishing Token we got one previous chapter
SMS Configuration
A setup guide on configuring all SMS providers.
How to setup Twilio (SMS) service?
- Log into your Twilio project at www.twilio.com/console. If you don't have account yet, create one.
- Click on https://console.twilio.com/us1/develop/sms.
- Create your own app by clicking on Start Sending Messages.
- Once your app is created, Go to Try It Out
- Select your number, if you don't have a number, buy one from Twilio.
- Once done, you'll get Account SID, and Auth Token.
- Go to
Admin Panel -> Settings -> E-mail & SMS Setup -> SMS Settings -
Edit the following options:
- Default SMS Provider - Choose Twilio.
- Twilio account_sid - Your Account SID we got one previous chapter
- Twilio auth_token -Your Auth Token we got one previous chapter
- Twilio Phone number - Enter the phone number you purchased from Twilio.
- Your Phone Number - Enter your own phone number, ex: +9053..
How to setup BulkSMS (SMS) service?
- Log into your BulkSMS account at https://www.bulksms.com/account/#!/login/. If you don't have account yet, create one.
- Buy Credits .
- Go to
Admin Panel -> Settings -> E-mail & SMS Setup -> SMS Settings -
Edit the following options:
- Default SMS Provider - Choose BulkSMS.
- Your Phone Number - Enter your own phone number, ex: +9053..
- BulkSMS Username - Your bulksms account username
- BulkSMS Password - Your bulksms account password.
How to setup Infobip (SMS) service?
- Log into your Infobip account at https://www.infobip.com/. If you don't have account yet, create one.
- Once logged in, go to https://portal.infobip.com/settings/accounts/api-keys/create.
- Fill the required data, (Enter the API name only).
- Click Submit
- Copy and grab the Public API Key .
- Go to
Admin Panel -> Settings -> E-mail & SMS Setup -> SMS Settings -
Edit the following options:
- Default SMS Provider - Choose Infobip.
- Your Phone Number - Enter your own phone number, ex: +9053..
- Infobip API Key - The API key you just created.
How to setup Msg91 (SMS) service?
- Log into your Msg91 account at https://control.msg91.com/signup/. If you don't have account yet, create one.
- Click here https://help.msg91.com/article/379-where-can-i-find-my-authentication-key to find the authentication key.
- If you are from India, please follow this guide https://help.msg91.com/category/341-dlt-related-process to get the DLT ID.
- Go to
Admin Panel -> Settings -> E-mail & SMS Setup -> SMS Settings -
Edit the following options:
- Default SMS Provider - Choose Msg91.
- Your Phone Number - Enter your own phone number, ex: +9053..
- Msg91 AuthKey - Enter the authentication key you got from step 2.
- Msg91 DLT ID - Enter the DLT ID if you are from India.
Monetization
General Information about WoWonder Monetization.
Advertising System
-
What is Advertising System?
-
Advertising System is a money earning feature, users can post ads in your website, with advertising system users can:
- Upload Image ads to website.
- Pay by CPC/CPM.
- Get paid from advertisers.
-
Advertising System is a money earning feature, users can post ads in your website, with advertising system users can:
-
How to turn on Advertising System?
- You can turn Advertising System On/Off from
Admin Panel -> Payment & Ads -> Advertisement System
- You can turn Advertising System On/Off from
-
How Advertising System Payment works?
- CPC, CPM, paid by user's wallet
-
What is CPC, CPM?
- CPC mean cost per click, how much will the system charge the user from every ad click?
- CPM mean cost per view, how much will the system charge the user from every ad view?
-
How much can I earn from this system?
- You can set the price you are willing to charge from advertisers from
Admin Panel -> Payment & Ads -> Advertisement System
- You can set the price you are willing to charge from advertisers from
Pro System
-
What is Pro System?
-
Pro System is a monthly subscription feature, with Pro system users can:
- Upload unlimited media files.
- Get Pro Badge.
- Boost posts in home page (featured posts).
- Boost pages in home page (featured pages).
- Get verification badge.
- See profile visitors.
- The ability to Show / Hide last seen.
-
Pro System is a monthly subscription feature, with Pro system users can:
-
How to turn on Pro System?
- You can turn Pro System On/Off from
Admin Panel -> Pro System -> Pro System Settings
- You can turn Pro System On/Off from
-
How Pro System Payment works?
- Monthly subscription, paid by user's wallet.
- You need to add ./expire_pro.php file to cronjob list.
Subscription System
-
What is Subscription System?
-
Subscription System is a monthly subscription feature, with Subscription users will:
- Pay you monthly to use your website.
- Earn money by new subscribers.
-
Subscription System is a monthly subscription feature, with Subscription users will:
-
How to turn on Subscription System?
- You can turn Subscription System On/Off from
Admin Panel -> Pro System -> Pro System Settings -> Pro Membership On Sign Up
- You can turn Subscription System On/Off from
-
How Subscription System Payment works?
- Monthly subscription, paid by user's wallet.
Self Hosted Ads
-
What is Self Hosted Ads?
-
Self Hosted Ads is a money earning feature, with Self Hosted Ads you can:
- Create free ads on entire website.
-
Self Hosted Ads is a money earning feature, with Self Hosted Ads you can:
-
How to turn on Self Hosted Ads?
- You can create HTML ads from
Admin Panel -> Payments & Ads -> Manage Site Advertisements
- You can create HTML ads from
MarketPlace (Buy / Sale)
-
What is MarketPlace?
-
MarketPlace is a money earning feature, with MarketPlace users can:
- Sell their own products.
- Buy products from other users.
-
MarketPlace is a money earning feature, with MarketPlace users can:
-
How to turn on MarketPlace?
- You can turn MarketPlace On/Off from
Admin Panel -> Manage Features -> Store -> Store Settings
- You can turn MarketPlace On/Off from
-
How MarketPlace Payment works?
- Per video sale, paid by user's wallet.
-
How much can I earn from this system?
- Your net earning will be (Commission Percentage * Product Price / 100) = Net Earnings, e.g: (2 * 12 / 100) = $0.24, so you'll get $0.24 from every new sale.
- You can change the commission percentage from
Admin Panel -> Manage Features -> Store -> Store Settings -> Sales Commission
WoWonder Features
General Information about WoWonder features.
Languages
-
How to add a new language?
- You can add new languages from
Admin Panel > Languages > Add New Language & Keys -> Add New Language.
- You can add new languages from
-
How to set the default website language?
- You can set the default language from
Admin Panel > Settings > General Configuration > Default Language.
- You can set the default language from
-
How to add a new language key?
- You can add new languages from
Admin Panel > Languages > Add New Language & Keys -> Add New Key.
- You can add new languages from
Categories
-
How to edit, delete and add categories?
- You can manage all categories from
Admin Panel -> Manage Features -> Manage Categories
- You can manage all categories from
How To Update WoWonder?
A detailed documentation on how to update your website to a new update. Don't worry the update process is very easy!
- First of all, you have to download the latest version from your codecanyon Downloads page.
- Backup your website files & database using cPanel.
-
Once you have downloaded the script, you can find the update files in
./Update Guidefolder, as shown below: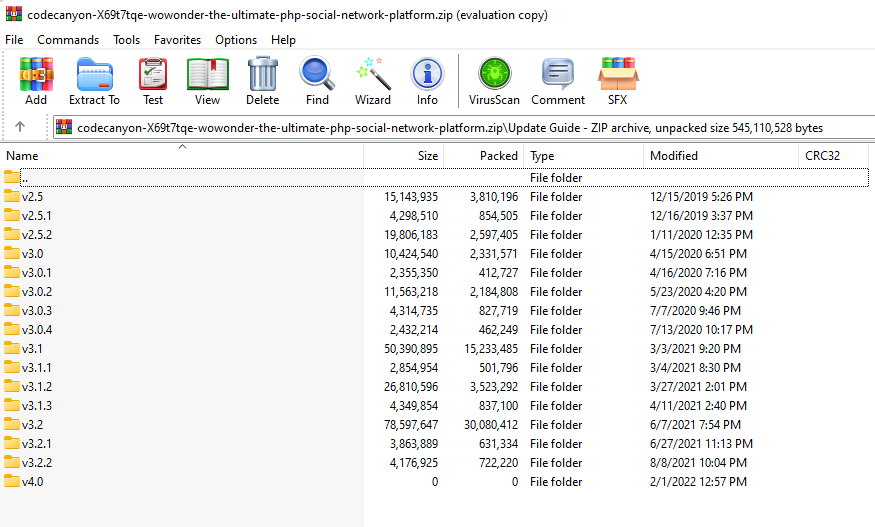
Choose the update version, and extract it to your Desktop.
Note: If you have missed an update or multiple updates, you have to update your site version by version manually.
Please don't skip a version.
e.g: (If your website is on v4.0.1 and you want to update to v4.1.2, you have to update to v4.1, v4.1.1 and then v2.2.4)Open the folder/version you want to update your website to,
v1.*- Upload and overwrite ALL files/folders (SELECT ALL) file(s) located inside folder to your server, as shown below:
If you have renamed your theme, please open
v4.*/themes/default/and upload & overwrite ALL files/folders to your theme folder.- Important Last Step: Once the files are uploaded and updated, open and run https://YOURSITE.COM/update.php
The update process may take up to 1 hour, once the update is done please go to Admin Panel and scroll down to verify the website has been updated as shown below:

Code Customization
We have included a Custom CSS/JS Files in the code so that you can better handle your Customizations for New Styles or Overwriting Default Theme Styles. Simply add all your Custom CSS/JS Codes in Admin Panel -> Design -> Custom Design
Where can I modify the HTML tamplates?
- You can find the layout files in
./themes/wowonder/layout/ - The files extention is .html
Where can I edit the stylesheet from?
- You can edit the stylesheet from
./themes/wowonder/stylesheet/ - The general style file is: style.css
Where I can add my own code inside head/body/footer tags?
- You can do that from
./themes/wowonder/layout/container.html
How can I create new themes?
- Make a copy of ./themes/wowonder/ folder, rename it, open ./YOUR_THEME/info.php and change the requested info there.
- Once you have changed the info, save the file, go to you
Admin Panel -> Design -> Themes, and you'll find your theme there, under your theme name, click on activate.
How to edit & customize email templates which are sent for users?
- You can do that from
Admin Panel -> Tools -> Manage E-mails
How can I edit the footer menu?
- You can edit the footer from:
./themes/wowonder/layout/footer/
Where are javascript files located?
- You can edit the javscript code from
./themes/wowonder/javascript/ - The general javascript file is: script.js
- Some JS functions are located at
./themes/wowonder/layout/extrajs/content.html
Common Issues
We listed some common issue you should be aware of and know how to fix them.
Please make sure that the .htaccess file is uploaded to your server and updated to latest version.
If the file is exists, but you still face this issue, please contact your host provide, and let them enable mod_rewrite.
If you are using a VPS with Ubuntu Linux installed, please follow this guide.
If you use Nginx in your server, please follow the last step in the installation page.
FAQs
A FAQ is a list of frequently asked questions (FAQs).
Please note that our respond can take up to 2 business days.
- Availability to answer questions, Answering technical questions about item’s features, Assistance with reported bugs and issues, Help with included 3rd party assets.
- Any customization request will be ignored.
- Please make sure to read more about the support policy.
Support
If this documentation doesn't answer your questions, So, Please send us Email via Item Support Page
We are located in GMT +5:30 time zone and we answer all questions within 12-24 hours in weekdays. In some rare cases the waiting time can be to 48 hours. (except holiday seasons which might take longer).
Don’t forget to Rate WoWonder!
Go to your CodeCanyon Profile > Downloads Tab > & then You can Rate & Review for our script.
Thank You.
Changelog
See what's new added, changed, fixed, improved or updated in the latest versions.
v4.3.4
- Fixed audio upload & sharing from admin panel if disabled, voice messages cannot be sent to users from the chat system.
- Fixed featured posts are disabled, pro members still gain the "featured post" privilege.
- Fixed when creating an advertisement in the audience section, if nothing is selected, there is an inscription: "nothing selected."
- Fixed event dates is not correct on sunshine theme.
- Fixed image rotation is not working correctly when you upload an image.
- Fixed br is added automatically when adding a new custom page, which causes issues.
- Fixed posting to friend timeline was not working.
- Fixed the "load more" button in the "pastevent" page in event system was not working.
- Fixed disabling monetization does not remove the subscription link from the logged-in user dropdown menu.
- Fixed if you edit blogs, it deletes "é," "á," "í," "ó" characters.
- Fixed the decimal point of the commodity amount in "market" was wrong.
- Fixed if a blog was approved from admin side, the money and points were not being credited to the user.
- Fixed sometimes uploading .docx doesn't work.
- Fixed if the user cancels a transaction, it was going to oops page instead of the wallet page.
- Fixed no one can see the comments added to reels.
- Fixed when viewing the reels, you cannot see who added the reels; only the photo in a circle.
- Fixed in the instagram mode version, there was no reels.
- Fixed load more for reels in profile not work.
- Fixed ok.ru login system had some issues.
- Fixed cashfree payment method required updating.
- Fixed login with wordpress was not working.
- Fixed ig mode sometimes can't be activated.
- Fixed 10+ api-related issues.
- Fixed 34 other minor bugs in code and design.
v4.3.3
- Improved speed again after v4.3 update.
- Fixed smtp related issues.
- Fixed API related issues.
- Fixed 5 other minor bugs.
v4.3.2
- Improved speed after v4.3 update.
- Improved speed of search system in admin panel.
- Updated few sections in sunshine theme (design).
- Fixed add account page broken on both themes.
- Fixed sometimes reels not loading more than 6 videos.
- Fixed social login system.
- Fixed showing dublicated transactions in wallet page.
- Fixed if a feature is turned off, it is still showing in directory page.
- Fixed comment section not showing in watch page.
- Fixed video playing in background instead of lightbox in watch page.
- Fixed sometimes photos were showing in watch page.
- Fixed 10 other minor bugs.
v4.3.1
- Fixed if you post a public post, then make it monetized, the subscribe button will not show.
- Fixed images were loading in reels.
- Fixed showing youtube videos on watch page which cause some issues.
- Fixed shwoing only one video in watch lightbox.
- Fixed monetization system caluclation was incorrect.
- Fixed showing the same ad multiple times in the story section.
- Fixed reels system, not showing more than 10 videos.
- Fixed scrolling down on phone does not work on reels page.
- Fixed currency issues in monetization system.
- Fixed backend config encryption system, the secret keys were not encrypted and could cause data leak.
- Fixed many issues in design.
- Fixed 10 other minor bugs.
v4.3
- Added monetization system, users are able now to sell their own content like only fans.
- Added directory system, users can view the site content without the need to login.
- Added the option to choose the default landing page, NewsFeed, Register, Welcome or Directory.
- Added reels system, users can upload their own videos as reels.
- Added watch page, users can view and watch all videos from one page.
- Added qiwi pament method.
- Added payfast payment method.
- Added switch accounts system, user can login to multiple accounts.
- Added the ability for users to create ads in story system.
- Added wordpress login system.
- Fixed 95+ reported bugs in the system.
- Improved code in few files.
- Updated few libs in PHP.
- Improved nodejs chat system speed and code.
v4.2.1
- Fixed contact us page on sunshien theme.
- Fixed messages list not showing on phone in sunshine.
- Fixed turn off / on notifications on sunshine theme.
- Fixed notifications bell not showing on sunshine on profile page.
- Fixed announcement text not showing on sunshine theme.
- Fixed comments cannot be made on blogs.
- Fixed users cannot be verified by moderators.
- Fixed avatars cannot be changed in manage genders page in admin panel.
- Fixed sorting by price doesn't work well on marketplace.
- Fixed creating an article in the blog and publishing it, it does not show words with accented letters.(à,è,ì,ò,ù).
- Fixed 10+ minor bugs in back and front end.
v4.2 (2 May, 2023)
- Added new theme, updated sunshine to v2 completely.
- Added AI image generation system, now users can generate images directly and post them.
- Added AI post and text generation system, now users can generate texts and post ideas directly and post them.
- Added AI article generation system, now users can generate articles in blog system.
- Added AI image editing system, users can edit their avatar and cover as they want using text promots.
- Added AI system using credit system, charge your website's users for each image, text generated.
- Added google authentication for two authentication system.
- Added authy authentication for two authentication system.
- Added Braintree payment gateway.
- Added new APIs.
- Added username restriction, disallow and band usernames.
- Added photo quailty option in admin panel.
- Added the ability to enable or disable start up page.
- Added the ability to choose RTL lang from admin panel.
- Added support for PHP v8.2
- Updated text editors.
- Fixed 10+ API issues.
- Fixed sitemap system generating more than 50K element in one file.
- Fixed Yoomoney payment not funding.
- Fixed text editor can't add images in edit terms or edit pages in admin panel.
- Fixed filter by active users in Admin > Manage Users not working.
- Fixed Moderator cannot edit languages.
- Fixed disabling blog system still showing create article link in header.
- Fixed Google Vision API not working if posting an album.
- Fixed video is no auto pausing if you scroll down to other posts.
- Fixed banned user's posts still showing on hashtag page.
- Fixed if the hashtag has capital letter it makes it an entirely different hashtag.
- Fixed broken datepicker in settings page.
- Fixed Invitation codes can not be generated in admin panel.
- Fixed /movies/watch url returning 404 page.
- Fixed when you create a fake user, and login in using the fake user info, you'll go to 404 and can't login in
- Fixed can't upload SVG images from edit or add reactions from admin panel.
- Fixed openweathermap API call, now it's all paid.
- Fixed The pro membership levels are still showing the old names on the dashboard even after changing all the names.
- Fixed ReCAPTCHA is not showing on first visit to contact us page, if you refresh the page it will be showing then.
- Fixed Google Translation is not working.
- Fixed The notification sound is not working with Ajax.
- Fixed can't logout using nginx.
- Fixed all emails are being sent like mime format.
- Fixed Events that have been finished, shouldn’t be open to join.
- Fixed If you want to make a user Admin of your page, Privileges can not be changed for that user. The button is not working
- Fixed 1 security issue.
- Fixed 20+ more minor bugs.
v4.1.5 [Urgent Update] / 14-02-2023
- Added Cache System, now your website speed is 80% faster, average load dropped from 1.2s to 0.15ms.
- Fixed 4 security issues, in follow privacy, bruteforce on login & two auth, XSS in messages using nodejs.
- Fixed 2+ more minor bugs.
v4.1.4
- Fixed multi user delete was not working from admin panel.
- Fixed slow load when visiting the website first time.
- Fixed br tag showing on user about, pages, groups and products.
- Fixed wasabi not working with nodejs.
- Fixed jpg images with webp mime type returning null images.
- Fixed videos are playing even though you play another video.
- Fixed coinbase payment returning to 500 Internet server error when canceling a payment.
- Fixed profile completion system not working in Instagram mode.
- Fixed movies cannot be added by moderators.
- Fixed showing long balance in my earnings page.
- Fixed post limit per hour not working.
- Fixed 4+ more minor bugs.
v4.1.3 (9 Sep, 2022)
- Fixed funding page design was broken.
- Fixed sending a not supported file in chat won't show the wrong file format pop up.
- Fixed when you send a file or an image in chat, clicking on the image doesn't open it.
- Fixed "now ago" showing on notifications.
- Fixed files are not being deleted from third party storage after deleting the post.
- Fixed article link will not open if there an extra slash at the end.
- Fixed 4+ more minor bugs.
v4.1.2 (2 Sep, 2022)
- Added new emojis to messages and posts.
- Added drag and drop to upload stories page.
- Added unseen effect to stories.
- Added new video player.
- Added video player for movies.
- Added drag and drop to create an album page.
- Added audio player on chat when sending a recording file.
- Added new dropdown menu on header, post and profile.
- Added new upgrade to pro system. Now users can upgrade to another pro package using the same go pro page instead of using settings page.
- Added new cron-job.php file, (should be added).
- Added ISO system for langs.
- Added Href SEO meta tags.
- Added BACKBLAZE stroage.
- Added the ability to upload files from server directly to third party stroages like S3.
- Added custom endpoint for each storage (CDN support).
- Added new reaction icons.
- Added stories unseen border colored animation (profile page).
- Added 10+ more regions to Wasabi, Ocean and Amazon.
- Added the ability to choose who can use the affiliate system.
- Added the ability to edit forum sections and forum names.
- Added the ability to set custom minimum withdrawal amount.
- Added "Add Photo" button to post publisher box after choosing an image.
- Added Google Translate API for posts.
- Added "Email Deliverability" system to debug and check the log of SMTP settings.
- Added Hindi, Urdu, Chine, Indonesian, Croatian, Hebrew, Bengali, Japanese, Portuguese, Italian, Persian, Swedish, Vietnamese, Danish, and Filipino languages.
- Improved design / colors in default theme for few sections.
- Improved code security.
- Removed 10+ unused files.
- Updated loading icon for notification dropdown.
- Updated design of user list in right sidebar in user profile page .
- Updated movies watch page design.
- Updated funding page design.
- Updated date selector for events, profile and other sections.
- Updated user settings page.
- Updated keyboard shortcuts model design.
- Updated header icons.
- Updated "Profile Completion" design.
- Updated page design.
- Updated start-up page.
- Updated chat tab design.
- Updated wallet page design.
- Updated design in few section in sunshine theme.
- Fixed reply to messages on sunshine theme (nodejs).
- Fixed video / audio call dialog not closing if there are multiple tabs.
- Fixed "mark all messages" as read button was hanging.
- Fixed stickers not working on nodejs.
- Fixed FTP storage was not working on nodejs.
- Fixed SEO links on movies, added movie title to movie link instead of using only /ID
- Fixed showing dollar sign on points page even if you have a different currency.
- Fixed clicking on "Advanced Search" was redirecting to 404 page.
- Fixed create blog link could be accessed even if the permission is not allowed.
- Fixed points were not added if the blog approval system was enabled.
- Fixed blog is not deleted if you delete the blog post.
- Fixed Agora live streaming.
- Fixed Wallet + Balance were showing on "My Earnings" page.
- Fixed group chat notifications (nodejs).
- Fixed br tags showing on post title.
- Fixed video files are not deleting from the server (FFmpeg)
- Fixed promoted pages/posts were not reset after the pro membership is ended.
- Fixed 3 nodejs warning messages.
- Fixed comment is not working when using the french language.
- Fixed the ability to upload multiple images on the product.
- Fixed wasabi not working on default east region.
- Fixed UTF-8 characters not working on games.
- Fixed "Max Upload Size" not updating from admin panel.
- Fixed user can upload audio files even if the audio upload is not allowed for the user group.
- Fixed weather not showing on the sunshine theme.
- Fixed audio recording upload using nodejs from chat and messages page.
- Fixed can't post if post approval system enabled from admin panel.
- Fixed 50+ design and frontend minor bugs.
- Fixed 10+ more minor bugs.
v4.1.1 08 Jul 2022
- Added story viewed time.
- Improved design / colors in default theme for few sections.
- Improved audio player design.
- Fixed create article issue.
- Fixed live streaming privacy not updating in admin panel.
- Fixed pick your plans, go pro plans were not showing on welcome page.
- Fixed CROS issues in nodejs.
- Fixed wallet system was not accepting top ups more than 1000
- Fixed message button was not showing on profile (mobile).
- Fixed {site_name} showing on registration page.
- Fixed charts were not showing on groups and pages if loading using ajax.
- Fixed stories now are ordered by DESC instead of ASC.
- Fixed chat colors, default color was black.
- Fixed birthday showing NULL on profile page sometimes.
- Fixed clicking on stories next shows pervious story.
- Fixed charecter limit on privacy page.
- Fixed disabling pages was disabling the create button on top header.
- Fixed YouTube videos on Instegram mode wasn't working.
v4.1 30 Jun 2022
- Added report user system + reason.
- Added ban message on user profile if user is banned.
- Added Instagram Mode.
- Added flutterwave payment method.
- Added Ngenius payment method.
- Added Aamarpay payment method.
- Added the ability to add custom pro packages.
- Added the ability to add custom withdrawal method.
- Added the abiltiy to choose whom can use a feature, Admin, All Users, Only Pro.
- Added the ability to resend two auth verfication code.
- Added new design for Instegram mode.
- Added developer mode to admin panel.
- Updated documentation & FAQs: https://docs.wowonder.com/ .
- Updated email verfication page design.
- Updated chat design.
- Updated all website shadow elements (css).
- Updated header notifications, messages dropdown size.
- Updated post comments design.
- Improved design in default theme for few sections.
- Fixed qrcode.js was missing in sunshine.
- Fixed search in admin panel was not working well.
- Fixed login using twitter.
- Fixed admin commission was not appearing with product purchase.
- Fixed OG meta tags for albums.
- Fixed XSS vulnerability.
- Fixed fixed product showing in stock while there is no stock left.
- Fixed announcements wern't working.
- Fixed agora live video / calls.
- Fixed google login API.
- Fixed twilio video/audio calls.
- Fixed if post was boosted on a page it doesn't appear in booted posts section.
- Fixed the ability to send gif & stickers on nodejs.
- Fixed 40+ more minor bugs.
- Fixed bugs in API.
v4.0.1 (23 Feb 2022)
- Added audio player for mp3 files.
- Added yandex API for maps.
- Added yandex payment method.
- Added iyzipay payment method.
- Added securionpay payment method.
- Added authorize.Net payment method.
- Added ok.ru social login.
- Added new APIs in developers page: get_pages, get_groups, get_products, get_followers, get_following, get_friends
- Added mobile apps links in welcome page and sidebar, managed from admin panel -> website information.
- Updated design in few sections.
- Updated documentation & FAQs: https://docs.wowonder.com/ .
- Fixed price not showing in products.
- Fixed links not working on profile page.
- Fixed ajax load in few pages.
- Fixed broken images when importing a link.
- Fixed add as familly system.
- Fixed XSS vulnerability.
- Fixed 10+ more minor bugs.
- Fixed bugs in API.
v4.0 (07 Feb 2022) [Ultimate Update]
- Added website mode, switch your website instantly to Linkedin mode. (Instagram, Twitter, AskFM, Patreon are coming soon).
- Added website mode, switch your website instantly to Linkedin mode. (Instagram, Twitter, AskFM, Patreon are coming soon).
- Added marketplace system, users can now buy and sell products + admin commission.
- Added moderator rules manager, now you can choose what a moderator can do.
- Added more ads placements (jobs, forums, movies, offers & funding) & entire site option.
- Added multiple levels affiliate system.
- Added custom ban message for every user.
- Added the ability to translate terms pages.
- Added CoinBase payment method.
- Added new search system for Linkedin mode.
- Added more APIs.
- Added ReCaptcha to create article page.
- Added Wasabi Storage.
- Added new welcome page.
- Added remember me on login page.
- Added mutli languages support for terms, privacy and about pages.
- Updated bulksms API.
- Updated CoinPayments API.
- Updated Infobip API.
- Updated marketplace, jobs & movies pages design (default theme).
- Updated desgin in a few other pages (default theme).
- Updated Twilio SDK.
- Updated left sidebar icons. (default theme)
- Updated documentation & FAQs: https://docs.wowonder.com/ .
- Cleaned 10,000+ lines of outdated code.
- Orginzed PHP code format (HTML coming in next update).
- Fixed images with _small extensions is not getting deleted on remote storage.
- Fixed watermark isn't working on images posts.
- Fixed family memebers texts.
- Fixed auto username, pages likes or groups joins isn't working when you register using the app.
- Fixed login with instagram isn't working.
- Fixed email notifications are not working on follow, view profile or comments.
- Fixed digitalocean test button wasn't working in admin panel.
- Fixed Audio/video calls are not working from website to apps using agora.
- Fixed "common things" page php fatal error.
- Fixed 2 XSS exploits. [Important!]
- Fixed blank page when adding / in url.
- Fixed site-map doesn't generate more than 50K links.
- Fixed read more button on mobile.
- Fixed 30+ more minor bugs.
- Fixed bugs in API.
v3.2.2 (09 Augest 2021)
- Added Palestine to country list.
- Removed dublicated nginx rules in nginx.conf, update required for nginx users.
- Replaced Yahoo weather with new provider https://openweathermap.org
- Fixed live video not working on firefox.
- Fixed blog point issue, user will get points now after approving.
- Fixed nearby shops counter.
- Fixed line break issue in nodejs chat system.
- Fixed refund page wasn't apearing.
- Fixed add movies page in admin, sometimes it looks broken.
- Fixed bank details wasn't getting updated in admin panel.
- Fixed issues in desgin.
- Fixed video post on MySQL 8 and PHP 8.
- Fixed more minor bugs.
- Fixed bugs in API.
v3.2.1 (28 June 2021)
- Added delete account E-mail to Manage Emails in admin panel.
- Re-orginzed admin panel links, content, texts and created auto save system.
- Fixed seen issue on nodejs.
- Fixed FTP support on nodejs.
- Fixed "View X Posts" on newsfeed (NodeJS).
- Fixed 2 security issues (important).
- Fixed double points when posting multi images.
- Fixed 500 Error when accessing a page without being logged in.
- Fixed URL fetcher, it wasn't fetching URLs from WoWonder blogs.
- Fixed bugs in API.
v3.2 (8 June 2021)
- Added ability to edit and translate emails from admin panel, under Tools > Manage E-mails.
- Added expire time for reset password links, 12 hours.
- Added FFMPEG for video conversation + thumbnail generation + debug ffmpeg feature from admin panel + up to 4K video support, (Enable / Disable).
- Added auto username generator, for new user registration users are not required to write their username. (Enable / Disable)
- Added new APIs, more than 40+.
- Added reactions for messages, (ajax / nodejs).
- Added reply system for messages, (ajax / nodejs).
- Added reactions system for stories.
- Added reply system for stories.
- Added gifs + stickers to comment system.
- Added gifs + stickers to reply system.
- Added video chat by Agora.
- Added terms of use checkbox to contact us page.
- Added the ability to delete poll answers while creating one.
- Added login with Mailru, Discord, WeChat and QQ.
- Added ability to delete selected user's messages, stories, posts, articles, and notifications from admin panel.
- RE-ADDED script version in admin panel sidebar.
- Updated twilio video chat system.
- Updated message seen systemn (NodeJS).
- Fixed 80+ reported bugs and improvments.
- Fixed bugs in API.
v3.1.3 (12 April 2021)
- Added real-time notification system.
- Improved server load & site speed.
- Removed All PHP ajax intervals, requests, and loops from clinet end (if nodejs enabled) and replaced to realtime web socket.
- Fixed 3+ reported bugs.
- Fixed bugs in API.
v3.1.2 (28 March 2021)
- Added support for PHP 8.0+ and MySQL 8.0
- Added new ajax load system for admin panel, now admin panel pages are loaded thru ajax.
- Updated nodejs chat system, now users can see typing action on messages user list, real time avatar update, name, and status.
- Updated S3 / Spaces libraries.
- Improved speed on PHP 8.0
- Fixed 20+ reported bugs.
- Fixed bugs in API.
v3.1.1 (05 March 2021)
- Fixed 10+ reported bugs.
- Fixed bugs in API.
v3.1 (04 March 2021)
- Added new messaging system powered by NodeJS and websockets, now chat are faster, real time, and smoother.
- Added new admin panel v2, with many options.
- Added new timestamp system, e.g (1 mintue ago -> 1 m, 2 hours ago -> 2 hrs, 1 month ago -> 4 w, 1 year ago -> 1 y)
- Added new notifications for admin panel, now you'll get notificed for any new bank payments, verfication requests and more.
- Added night mode to admin panel.
- Improved security. [Important]
- Fixed 60+ reported bugs.
- Fixed bugs in API.
v3.0.3 (08 July 2020)
- Added ability to choose camera on live streaming.
- Added thumbnail for live streaming videos.
- Added female avatar for female users.
- Added Few more APIs. (payment methods)
- Fixed 20+ reported bugs.
- Fixed bugs in API.
v3.0.2 (26 May 2020)
- Added Agora Live Streaming.
- Added Few more APIs.
- Fixed 40+ reported bugs.
- Fixed bugs in API.
- Improved Load speed.
v3.0.1 (18 April 2020)
- Fixed 10+ bugs.
- Fixed bugs in API.
v3.0 (16 April 2020 [Ultimate])
- Added the ability to edit/add/disable post reactions.
- Added memories system, user can view his memories on this day.
- Added live stream for posts [enable/disable] (third party sites).
- Added page analytics, view latest likes per week, month, year, and today.
- Added group analytics, view latest joins per week, month, year, and today.
- Added blog post notifications, get a notification when someone comments on your blog post.
- Added forum notifications, get a notification when someone comments on your forum thread.
- Added the ability to require membership on sign up, [enable/disable]
- Added sub categories for pages, groups and marketplace.
- Added custom fields for pages, groups and marketplace.
- Added remaining pro membership days announcement.
- Added recurring payments for pro system.
- Added the ability for only pro users could upload [enable/disable].
- Added the ability for only pro users could make calls [enable/disable]
- Added blog posts review/approval system.
- Added the ability to request refund for pro package [enable/disable]
- Added refund policy page.
- Added paystack, razorpay, paysera and cashfree payment methods.
- Added page to show shops/businesses nearby.
- Added offer system for pages.
- Added password complexity system on register page.
- Added prevent brutforce on login system, limit failed login per min.
- Added the ability for users to be able to post in the pages. [enable/disable]
- Added the ability for pages and groups owners could add moderators with certain privileges.
- Added google cloud for storage.
- Added bank account withdrawal method, user can send his bank info to admin and admin can review then approve.
- Added email mock system. send email for users who didn't login for X time.
- Added the ability to add games from other sites, not just miniclip.
- Added the ability to get notified when user posts new post.
- Added ads within and inside articles.
- Added the ability for users to generate invite links.
- Added shout box, post anonymously.
- Added the ability to get notified when a friend posts a new post.
- Fixed 50+ bugs.
- Fixed bugs in API.
- Fixed Important security issues.
v2.5.2 (7 Jan 2020 [Important])
- Added click button to comment and reply.
- Fixed bugs.
- Fixed bugs in API.
- Fixed Important security issues.
v2.5.1 (17 Dec 2019 [Important])
- Added view joined groups and liked pages from one page.
- Added the ability to attache photos in commment replies.
- Added missing files from v2.5
- Fixed bugs in API.
v2.5 (16 Dec 2019 [Script improvments update])
- Added the ability logout from all sessions.
- Added the ability to approve or decline a post, enable / disable.
- Added new APIs.
- Added auto like for pages and auto join for groups.
- Updated PHP libaries.
- Updated Google login API.
- Improved default theme desgin.
- Improved speed.
- Improved english in some parts.
- Fixed 100+ reported bugs and issues.
- Fixed bugs in API.
v2.4 (01 Sep 2019)
- Added the ability to send messages to pages.
- Added the ability to accept or decline a group chat invitation.
- Added job system, users can now create jobs and hire.
- Added weather plugin to sidebar.
- Added common things page, now you can find users that matches your information.
- Added funding system, users can create funds, and get paid.
- Added new APIs.
- Fixed 20+ reported bugs.
- Fixed bugs in API.
- Improved speed.
v2.3.3 (11 July 2019)
- Added few new APIs to v2.
- Fixed 20+ reported bugs.
- Fixed bugs in API.
- Improved script stabilitiy for v2.4
- Improved speed.
v2.3.2 (20 June 2019)
- Fixed 20+ reported bugs.
- Improved speed.
v2.3.1 (2 June 2019)
- Fixed 10+ reported bugs.
- Fixed security issue.
v2.3 (30 May 2019)
- Added Manage currencies from admin panel, add any currency, remove, delete, one currency for all, pro, ads and market.
- Added the ability to comment on albums, and multi images.
- Added filter comments, top and latest.
- Added the ability to make forums, marketplace and events public and reachable by google.
- Added the ability to enable / disable PayPal payment method.
- Added the ability to disable a language without deleting it.
- Added the ability to enable / disable pokes, and "good monring" message.
- Added the ability for users to make comment on post before sharing it.
- Added the ability to block a domain from email while siging up, example, blocking @gmail.com
- Added embeded product style to messages.
- Added colored posts, with the ability to manage, add, remove and edit them.
- Added 2Checkout payment method.
- Added search on admin panel.
- Changed password hash from sha1 to password_hash encryption.
- Improved ajax speed by reducing requests.php file size and seperating the requests.
- Fixed 20+ reported bugs.
- Fixed API issues.
- Fixed security issue.
v2.2.2 (12 April 2019)
- Added deepsound embed feature, now you can embed the player from deepsound to wowonder.
- Fixed 20+ reported bugs.
- Fixed security issue.
v2.2.1 (6 April 2019)
- Added support for PHP 7.3+
- Fixed 30+ reported bugs.
v2.2 (1 April 2019)
- Added The ability to add and manage genders from admin panel.
- Added The ability to earn points by creating blogs.
- Added points daily limit for pro and free users.
- Added The ability to edit group chat info and avatar.
- Added The ability to turn off messages from friends or everyone.
- Added the ability to filter porn and nude pictures using Google Vision API.
- Added user will require to verfiy his email if he changed is from settings page, if email verfication is enabled.
- Added new sharing system, with new style and the abiltiy to share to timeline, group and pages.
- Added the ability to manage pro packages name, icon, features, prices, and disable which one of them
- Added the ability to manage pages, groups, products and blog categories from admin panel > manage features + seperated.
- Added the ability to view the reactions, likes, dislikes on comments and replies.
- Added the ability to view reactions, likes of posts on new model.
- Added bank payments for wallet and pro.
- Added group chat API, albums API, Pokes API and few other APIs.
- Added group chat notifications.
- Added the ability to delete a user posts by one click from admin panel.
- Added recaptcha to contact us from.
- Added new message page desgin for default theme.
- Fixed few important bugs.
- Fixed secuity threat, URGENT an update is required.
v2.1.1 (29 January 2019)
- Added Download my information, user can download personal info, pages, groups, posts and friends.
- Fixed few important bugs.
v2.1 (20 January 2019)
- Added new theme, "sunshine".
- Added new story system for both themes.
- Added filter system on marketplace, on the new theme.
- Added hashtag posts count, on new theme.
- Fixed few bugs.
v2.0.3.1 (30th Octobar 2018)
- Fixed few important bugs in wallet system and other major bugs.
v2.0.3 (16th Octobar 2018)
- Added confirmation system when user login from new location.
- Added two-factor authentication system using email or phone.
- Fixed few bugs.
v2.0.2 (9th Octobar 2018)
- Added new video player.
- Added the ability to disable / enable google maps.
- Added the ability for admin to top up any user wallet.
- Added IP to session manager.
- Added the ability to disable / enable comments on each post.
- Fixed 9 reported bugs.
v2.0.1 (5th Octobar 2018)
- Fixed 11 reported bugs.
- Improved Script speed.
- Fixed important security vulnerability.
v2.0 (30th Sep 2018)
- Added digitalocean spaces storage.
- Added poke system.
- Added reaction system (Like, Haha, wow, angry, love).
- Added gift system, users can send each other gifts.
- Added statics and charts to daily ads views / clicks.
- Added Infobip to SMS providers.
- Added stripe to wallet system like on go pro page.
- Added password recovery by phone number.
- Added estimated user reach on create ads page.
- Added bitcoin (coinpayments) payment method for ads and pro system.
- Added Payment Transactions history for wallet topups and pro system, with the ability to turn this feature on or off.
- Added the option to change the phone number from settings page.
- Added popular posts page.
- Added photos & videos sections to profile.
- Added End video chat button.
- Added ability to use percentage in the affiliate system.
- Added telegram to share options.
- Added admin can disable and enable social share links.
- Added more emojies.
- Added shortkey for posts, clicking "j" to scroll to next post.
- Added points system, user can earn points for posts, comments, likes, dislikes, wonders, and reactions. (User can spend points on pro or ads, or he can requst them as dollars).
- Added stickers to chat and messages.
- Added rotate system for images.
- Added Manage developer applications from admin panel.
- Added Report comment to admin.
- Added Advanced search system for custom fields.
- Added Added filter by age, and verfied to the search system.
- Added suggested groups / pages in my groups and my pages.
- Added search system in blog.
- Added auto friend system (Auto follow / friend with new registred users).
- Added the ability to view mutual friends from the profile (friends system).
- Added the ability to know who viewed your stories via notifications.
- Added ReCaptcha check to forgot password form (secuirty).
- Added blog comment notifications.
- Added Email notification when the user's account was deleted.
- Added a warning message before unfriending someone.
- Added session manager (users can view / manage browser / platforms where they are logged in).
- Added notification management system (Users can choose what kind of notifications they want to get).
- Added the ability to add followers to a specific user using IDs, in Admin > Users (Enabled just in follow system).
- Added blacklist system, admin can blacklist emails, usernames, and IP addresses.
- Added activities system, user can view his own activities from his profile (like, dislike, react, wonder, comment, reply, follow, friends).
- Added the ability for a user to choose if their profile should be found/indexed by search engines.
- Improved load speed.
- Compressed JS files to few less files.
- Fixed bugs on API.
- Fixed major bugs in the script. (+10)
- Fixed 3 security issues.
v1.5.6.2 (27th Jun 2018)
- Added New welcome page for the default theme.
- Added Wasabi storage support.
- Upgraded PHPMailer to v6.
- Fixed 10+ reported bugs.
v1.5.6.1 (13th Jun 2018)
- Added Day status to default theme (good morning etc).
- Improved wonderful theme desgin and forms.
- Improved publisher box stability.
- Removed Weather plugin from wonderful theme due copyright issues.
- Fixed 10+ reported bugs.
v1.5.6 (27th May 2018)
- Added FTP client server to store files, images, videos on other servers.
- Added GDPR compliance (cookie frame, checkboxes, privacy policy)
- Added full new APIv2 + docs.
- Added the ability to edit movies from admin panel.
- Added the abilty to post mobile emojies on posts, comments, and messages.
- Added Auto delete system for users and posts that are longer than X date.
- Added Crop system for user avatar.
- Translated all page's titles.
- Improved load post speed on wonderful theme.
- Fixed 3 security issues.
- Fixed 50+ reported bugs.
v1.5.5.3 (17th April 2018)
- Added two keys for OneSignal.
- Added video call API for mobile applications.
- Improved the cache system for user data.
- Fixed all reported bugs.
v1.5.5.2 (6th April 2018)
- Improved content load and server load 50% faster.
- Fixed all reported bugs.
v1.5.5.1 (29th March 2018)
- Fixed facebook / google login issues.
v1.5.5 (20th March 2018)
- Added new theme (default).
- Fixed issues & high security vulnerability.
v1.5.4.3 (30th January 2018 (Important update!))
- Fixed issues & high security vulnerability.
v1.5.4.2 (4th January 2018)
- Added Indian currency.
- Added new API for movies, stories.
- Fixed 7+ important reported bugs.
- Script stability checkout.
v1.5.4.1 (22th December 2017)
- Added Cache-Control to Amazon hosted files.
- Fixed 5+ important reported bugs.
v1.5.4 (13th December 2017)
- Added the ability for users to send money to each other using their wallet balance.
- Added Email messages notification for offline users.
- Added the ability to import images from links in post system.
- Added profile percentage system. (Fill your profile details for new users).
- Added new pagination system with a search feature to admin panel (Users, Pages, Groups, Posts).
- Added new ads placed in the ads system (Users can create ads on videos posts).
- Added Iframe support for the forum Editor.
- Added share to wowonder button to blogs.
- Added the ability for users to choose a default thumb when uploading a video in publisher box.
- Added playtube video player integration.
- Changed video player to mediaelement.js
- Expired events will be deleted automatically.
- Hid admin details in mass notification system and replaced it with site favicon/name.
- Changed the blog system design.
- Fixed 7+ reported bugs.
v1.5.3.2 (15th November 2017)
- Added more regions to Amazon S3.
- Added explore link to left sidebar.
- Fixed 15+ reported bugs.
v1.5.3.1 (21th October 2017)
- Added custom currency for the ads system.
- Added web push notifications.
- Added custom CSS / JS code to admin panel.
- Fixed 10+ reported bugs.
v1.5.3 (1st October 2017)
- Added new powerful admin panel.
- Added push notification system for all site notifications.
- Added the abiltiy to disable wonder/dislike buttons.
- Added new API files, find friends, events, stories create groups pages and events.
- Added support for Opera mini and UC browsers.
- Fixed 15+ reported bugs.
v1.5.2 (4th September 2017)
- Added privacy option for users “Share my location with public?”.
- Added friends stories to home page.
- User now can view his own ads.
- Added the option to upload images to blog system.
- Added multi currency in classified.
- Added video chat API for the windows application.
- Added ads prices in craete ads page.
- Improved the ads view design.
- Improved admin panel, changed tables to datatable.js
- User can't create ads if wallet is empty.
- Fixed 40+ reported bugs / improvements.
v1.5.1 (27th August 2017)
- Fixed all reported bugs.
v1.5 (24th August 2017)
- Added advertisement system. (Clicks, impressions)
- Added story system. (status, automatically gets removed after 24 hours).
- Added new comment system for blogs and movies.
- Added group chat system.
- Added mass notification system in the admin panel.
- Added the ability to edit comment's replies.
- Added the ability to delete posts directly from home page (admins).
- Added the ability to delete any comment (admins).
- Added hide posts feature.
- Added 30+ more emojis.
- Added full verification form (ID, photo, description).
- Added new post sharing system.
- Added sitemap generator.
- Added registration invite system (Users can register just with invite link).
- Added new albums style (Collapsed).
- Added new admin panel sidebar (Collapsed).
- Added the ability to choose specific users in Mailing List.
- Added the ability to enable/disable ads system, story system.
- Added manage ads, stories (status) in the admin panel.
- Added "Who can see my friends" privacy option.
- Added multi date formats support.
- Added the ability to lose the verification if the username was changed.
- Added youtube/video link support for movies system.
- Added multi admins for groups and pages.
- Added gifs using "Giphy" API for messages/posts.
- Added API support for upcoming IOS application.
- Added Lightbox for images on messages, comments, and replies.
- Added page rate system, users can rate page from 0/5.
- Added report system for profiles, pages, and groups.
- Added new API for the new powerful windows desktop application.
- Added family members list (add a friend as a brother, father etc..)
- Added relationship assignment, e.g: Lisa is in a relationship with Zach
- Added find friends nearby (find friends near you within 100KM).
- Added alert feedback if file mime type/extension is not supported.
- Added alert if the file is larger than the max allowed size in publisher box, messages and chat.
- Upgraded Password hash system from MD5 to SHA1
- Changed the trending system to be updated weekly.
- Updated font-awesome library.
- Updated emojis library.
- Fixed bugs on API.
- Fixed major bugs in the script. (+30)
- Improved load speed.
- Fixed 2 security issues.
v1.4.5.2 (18th June 2017)
- Added audio recording to Post/Comment systems.
- Upgraded the API to the newest version for the new android messenger update.
- Fixed bugs in the script.
v1.4.5.1 (6th June 2017)
- Added movies system.
- Added translate system for posts.
- Added video views system.
- Fixed twilio SMS bug.
- Fixed bugs in the native app API.
- Fixed few bugs in the script.
v1.4.5 (25th May 2017)
- Added forum system.
- Added events system.
- Added "Login with WoWonder" API feature + applications + documentation.
- Added "load more" button to the advanced search page.
- Added "Share to wowonder" button for third-party websites + documentation.
- Added custom chat colors for each conversation.
- Added push notifications support for Android messenger.
- Fixed video/audio call bugs.
- Fixed bugs in the native app API.
- Fixed few bugs in the script.
v1.4.4.5 (11th April 2017)
- Added blog system.
- Final release for full API system (for native apps).
- Fixed few bugs.
v1.4.4.4 (2nd March 2017)
- Added auto-updater system.
- Added windows server rewrite URL support (web.config).
- Fixed few bugs in the API.
v1.4.4.3 (23th February 2017)
- Improved the script theme.
- Upgraded jQuery library.
- Increased script speed.
- Fixed few bugs in the API.
v1.4.4.2 (10th February 2017)
- Updated API for IOS messenger.
- Fixed few bugs in the script.
- Fixed few bugs in the API.
v1.4.4.1 (27th January 2017)
- Updated Hybridauth library (Facebook login bug).
- Fixed more than +3 other bugs.
v1.4.4 (11th January 2017)
- Added "Read more" to product description.
- Added custom currency option for classified.
- Added custom mime types option to admin panel.
- Updated PHPmailer library (Security bug).
- Updated Hybridauth library (Google+ login bug).
- Fixed "copyright" text in footer.
- Fixed RTL design problems.
- Fixed UTF-8 issues in hashtag system.
- Fixed JavaScript code bugs in Apple products.
- Fixed Android / Windows messengers API requests.
- Optimized admin panel.
- Fixed more than +5 other bugs.
v1.4.3 (8th December 2016)
- Added the ability to translate custom fields.
- Added the ability to add/edit/remove languages from admin panel.
- Added audio calls.
- Added integration with the new WoWonder Android Messenger.
- Added the ability to manage pro membership periods.
- Added a button to manage and cancel expired pro users.
- Added Twilio API for sending SMS messages.
- Added android API for the upcoming native apps.
- Added Alipay to Stipe.
- Added hashtag post streaming.
- Added YouTube field to page social link settings.
- Added location field to classified system.
- Improved database structure.
- Improved SQL queries.
- Improved script speed.
- Design/Code optimization.
- Fixed bugs in messages system.
- Fixed few bugs.
v1.4.2 (10th October 2016)
- Added Amazon S3 integration.
- Added the ability to delete full conversations.
- Added the ability to delete recipient messages.
- Added Nginx support.
- Fixed an issue in login system.
- Fixed an issue while deleting a page from admin panel.
- Fixed few more bugs.
v1.4.1 (3rd October 2016)
- More than 10+ old and new bug fixes.
- Design/Code optimization.
v1.4 (25th September 2016)
- Added new welcome page.
- Added custom fields system.
- Added classified system.
- Added full affiliates system + payments.
- Added poll system.
- Added custom pages system.
- Added more payment methods, (Credit card, Bitcoin, american express).
- Added YouTube field to social links.
- Added integration with the new Windows Desktop Messenger.
- Added new posts updater system (Like twitter).
- Added image on comments system.
- Added full messaging API code for windows / Android / IOS.
- Added CSRF protection for more forms / ajax requests.
- Added terms link to registration page.
- Added the option to enable/disable notification sound.
- Added the option for user to filter posts by all or following.
- Added more ad placements (between posts).
- Added 'latest products' placement in sidebar.
- Added longer user session time.
- Added new design for messages system.
- Added custom backgrounds for pages.
- Replaced the URL scrape system with better one.
- Re-coded style.css file to .scss for easy coding and outputting.
- Speed/Design/Code optimization.
- Fixed Hashtag issues.
- Fixed birthday privacy issue.
- Fixed image rotation issue.
- Fixed image cropping issues.
- Fixed session hijacking security.
v1.3.4 (27th June 2016)
- Fixed all reported bug.
- Increased the script speed by 50%.
- Design/Code optimization.
- Upgraded the image optimization system to next level.
v1.3.3 (19th June 2016)
- Added video call/chat system for all devices.
- Added the option to view all posts or following posts.
- Added the option to enable/disable "developers" page.
- Added the option to enable/disable user registration.
- Added "maintenance_mode" to shut down the whole site.
- Added the option to send mailing list to "active, inactive, all" users.
- Added "disabled button" background color to admin panel.
- Added dropdown menu for messages button in header.
- Added gender field for Facebook social login.
- Added max posts/pages boosts allowed for per pro user to admin panel.
- Added "eapi link" for sending SMS.
- Added multi chat tabs (max 3 tabs).
- Added the option to change favicon from admin panel.
- Added CSRF protection for few more forms.
- Upgraded chat system + messages.
- Updated API to v1.3.1
- Optimized admin panel layout.
- Fixed few bugs.
- Speed/Design/Code optimization.
v1.3.2 (17th May 2016)
- Added the ability enable/disable games, pages, groups.
- Added full backup system, (backup your files, database, uploads easily with one click via admin panel).
- Added more currency types for payments, (RUB, PLN, ILS, BRL).
- Added pull to refresh to android application.
- Added test log for PayPal configuration.
- Speeded up loading time.
- Fixed redirection issue, (www or without www).
- Fixed default language on sign up.
- Fixed common bugs.
- Script optimization.
v1.3.1 (24th April 2016)
- Added more currency types for payments.
- Added the ability for groups admin to delete users posts.
- Added Portuguese language.
- Added 2 new design types to admin panel for header, (header input text, buttons text shadow).
- Added send button to comment field. (On mobile)
- Fixed common bugs.
- Fixed security bugs.
v1.3 (21th April 2016)
- Added SMS verification system (verify user by phone number).
- Added premium members (Star - Hot - Utlima - Vip) with PayPal / credit card integration.
- Added Android, IOS, and Windows Phone apps (web-view).
- Added cover re-position feature.
- Added birthday events on home page.
- Added the ability to boost posts & pages with monthly payments.
- Added post limit p/ hour for every user.
- Added registration limit p/ hour for every IP.
- Added custom CSS file for every user (user can completely re-design his own profile).
- Added Video.JS/Audio.JS for video & audio players.
- Added new speed for all action, (follow, add friend, chat, like, dislike, wonder, join etc ..).
- Added desktop notifications for Google Chrome / FireFox.
- Added the ability to upload .mov, .flv, .mpeg Videos.
- Added CSRF protection for common forms.
- Added user ranks, admin - moderator - user.
- Added send button to messages.
- Added top featured users bar (applying by paying).
- Added online users list to admin panel.
- Added invite system.
- Added og-Meta tags for social sharing.
- Added new loading system (loading content without refreshing the page) & bandwidth saver system.
- Added new E-mail notification system.
- Added block system.
- Added new sources for games importing.
- Optimized layout.
- Speeded up SMTP.
- Replaced cache system.
- Removed /welcome from welcome page URL.
- Updated API to v1.3.
- Script & code optimization.
- SEO optimization.
- Improved chat system usage of resources.
- Increased site security (XSS, CSRF, SQL, Spams).
- Fixed default country (USA).
- Fixed common bugs.
v1.2.3 (26th February 2016)
- Added SMTP server.
Added Login with username or email. - Added Build Version to admin panel.
- Fixed major bugs.
- Improved Security.
v1.2.2 (29th January 2016)
- Added auto suggestion for mentions in publisher box, comments, replies.
- Added Start up pages (Add photo, Fill some information, Follow users).
- Added terms pages to admin panel. (Admin can now edit terms pages from admin panel).
- Added video, audio upload setting to admin panel.
- Added welcome background image changer to admin panel.
- Added site design colors to email notification.
- Added user profile privacy for non-logged users.
- Added smiles button to comment, send message boxs.
- Added installer for easy installation.
- Fixed Bugs from your feedback.
- Script Optimization.
- Improved Speed.
- Improved Security.
v1.2.1 (12th January 2016)
- Added words wonder, dislike, like to the post action buttons.
- Added the ability to just like or dislike. (can't do it both).
- Re added emotions to post publisher box.
- Optimized chat requests.
- Fixed bugs from your feedback.
v1.2 (10th January 2016)
- Added group system
- Added game system
- Added dislike button (wonder or dislike)
- Added new lightbox
- Added login via Instagram
- Added verification request system
- Added photo album system
- Added multi photos upload
- Added autoload system for posts
- Added new search system
- Added recent searches
- Added page invitation system
- Added group invitation system
- Added ban ip system
- Added feelings/travailing/watching/playing/listening post status
- Added call to action system for pages
- Added online user counter on admin & home page
- Added location autocomplete for user/page setting
- Added design system (Customize your own website style & colors on very easy way from admin panel)
- Added recent searches
- Added notification popup
- Added profile visit privacy
- Added last seen privacy
- Added profile birthday privacy
- Added auto detector for Youtube, Dailymotion, Vine, Vimeo, Facebook videos & soundcloud links.
- Added https support
- Added comment replies system
- Added comment auto detector
- Added education to user profile information
- Added the ability to like/dislike/wonder/comment on user's profile picture & cover image
- Added email notification setting
- Added site statistics charts in admin panel
- Added ip address field to manage users page
- Added new language (Italian)
- Removed "@" from user profile URL
- Removed "p/" from page URL
- Removed "/home" from home page URL
- Changed the entire admin panel layout
- Changed the entire user/page/group setting layout
- Improved user popover
- Improved layout
- Improved layout on smartphones
- Improved chat system
- Improved site security
- Improved link preview
- Improved cache system to a higher level
- Updated API version to v1.1
- Script optimization
- Bug fixes
v1.1 (8th December 2015)
- Added Page System.
- Added Link Preview.
- Added User Typing System & Message "Seen" System.
- Added Profile Custom fields (Work, Company, Relationship, Location .. etc).
- Added Profile Google Map location.
- Added Profile Background image. (user can choose his own background image).
- Added Facebook, Vimeo, Dailymotion videos.
- Added User Details On Hovering on user link.
- Added Censored Words System.
- Added 4 New Languages (Dutch, German, Spanish, French).
- Added Search Posts System.
- Added HTML Support For Announcements.
- Changed Welcome Page Style.
- Changed Sidebar Style.
- Improved Layout & Styles.
- Improved Layout On Smartphones.
- Improved Admin Panel Layout.
- Added More features for Sending emails to all users.
- Script Optimization.
- Fixed Bugs.
- Improved Security.
v1.0 ()
Initial release.
License
WoWonder is made by DoughouzForest under Envato Extended & Regular License.
What is the different between Extended and Regular license?
- An Extended License is required if the end user must pay to use the end product, means that you should own an extended license if you will charge your end users.
- Both versions are similar, same features, updates and support services.
- Both can be used one domain only, means you need a license for every domain.
More PHP Scripts
Checkout Our Below Premium PHP Scripts Made by DoughouzForest


Social Login Setup
WoWonder comes with a lot of social login plugins, your users can register to your website with one click!
Here is a setup guide on configuring social login.